Tuesday, May 29, 2012

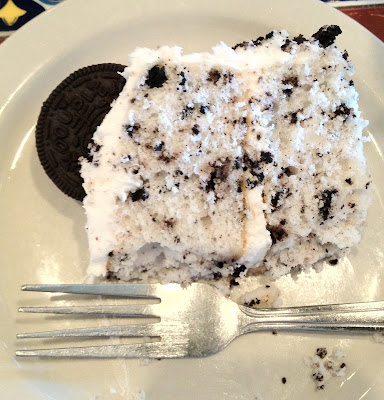
Oreo Birthday Cake

Oreo Cake for Two Birthdays


My mom and I have always shared a birthday party and cake....her birthday is the day after mine! And, its always on Memorial Day weekend, so I always have a day off work!

Side View

Well, this year we went to Chili's for lunch and I made our cake. (I know, I know....your not supposed to make your own cake....but I LOVE making cakes, and frankly mine are way better than store-bought. I prefer to make my own cake)

This recipe is from Taste of Home. And it was very delicious! (and pretty easy to make!)

Top View

The waiters at Chili's had been eyeing my cake throughout the entire lunch and people kept asking me where I bought it.... I love when people think my cakes are professional! : )

I decided to leave a few pieces for the drooling staff, and one of them even said "This is the best cake I have ever had!" And a few of them said they would pay a lot of money for a cake like that!

So, here it is. The recipe says it yields 12 servings.... but those would be gigantic slices. I cut the cake in about 19 slices and they were plenty big enough.

Ingredients
  • 1 package (18-1/4 ounces) white cake mix (I used Moist Supreme)
  • 1-1/4 cups water
  • 1/3 cup canola oil
  • 3 egg whites
  • 1 cup coarsely crushed Oroes (I used double-stuff Oreos)
Frosting
  • 1/2 cup shortening
  • 4 to 4-1/2 cups confectioners' sugar
  • 1/4 cup milk
  • 1 teaspoon vanilla extract

In the oven! I use Bake-Even strips to keep the cake even on top

Mmmmm.... Yummy!

Directions
  1. In a large bowl, combine the cake mix, water, oil and egg whites; beat on low speed for 30 seconds. Beat on high for 2 minutes. Gently fold in crushed cookies.
  2. Pour into two greased and floured 9-in. round baking pans. Bake at 350° for 30-35 minutes or until a toothpick inserted near the center comes out clean. Cool for 10 minutes before removing from pans to wire racks to cool completely.
  3. For frosting, beat the shortening, sugar, milk and vanilla in another large bowl until smooth. 
  4. Spread frosting on bottom layer, sprinkle with crushed cookies
  5. Top with second layer and spread frosting on top and sides.
  6. Decorate the top with half Oreos around the top edge, and finely crushed Oreos on the sides. 
  7. Place one Oreo top in the center of the cake.


Peanut Butter Banana Muffins

Banana Bread Muffins with Peanut Butter Chips


I got this recipe from one of my new favorite blogs, How Sweet It Is. These muffins are perfectly dense and so yummy! The peanut butter chips give them a nice flavor without being overwhelming.


I cut them in half, toast them for a few minutes and put some butter on them.....such an amazing breakfast!

Now, I made these regular size...even though I love my muffins in Giant form! I only did this because I am trying to watch my diet, and I don't need to be eating twice the muffin for breakfast....although I would love to!


Ingredients (makes 12 muffins)
  • 1 cup sugar
  • 1 egg
  • 2 cups all-purpose flour
  • 1/2 teaspoon salt
  • 1/2 cup unsweetened applesauce
  • 3 ripe bananas, mashed
  • 1 teaspoon baking soda
  • 1 teaspoon vanilla extract
  • 1/2 cup peanut butter chips (I use Reese's brand)

Directions (Soooo Easy!)
  1. Preheat oven to 350 degrees. Place muffin cups in muffin tins
  2. Mix sugar, applesauce, and egg until creamy and light yellow. 
  3. Add bananas and vanilla. 
  4. Add flour, baking soda, and salt. 
  5. Stir until completely smooth. 
  6. Fold in peanut butter chips. 
  7. Spoon the batter into the muffin tins.
  8. Bake for 25-30 minutes, until toothpick poked in center muffin comes out clean. I am starting to think my oven bakes hot, because these only took 22 minutes for me, and all my recipes are coming out on the low end of the baking times lately....maybe I should get an oven thermometer!

Strawberry Muffins

Streusel-Topped Strawberry Muffins


In keeping with the strawberry theme this week, I made Sean some strawberry muffins! He has been requesting them for weeks now, but I had never made (or eaten for that matter) strawberry muffins.


Well, turns out they were quite easy! As usual, I made them Giant muffins!

I found this recipe from Taste of Home, and what's handy about it is they list the nutrition information at the bottom, so you don't have to try and calculate how many calories you are eating. The bad news...since I made them giant, they are 426 Cals a piece, twice what I usually eat for breakfast :( I guess I will be leaving most of these for Sean to enjoy.

Moist Yummy Strawberry Pieces

MUFFINS
  • 2 cups all-purpose flour
  • 3/4 cup sugar
  • 1 teaspoon cream of tartar
  • 1/2 teaspoon baking soda
  • 1/2 teaspoon salt
  • 2 eggs
  • 3/4 cup strawberry yogurt (1 1/2 containers of yo-plait)
  • 1/4 cup sour cream
  • 1 cup chopped fresh strawberries

STREUSEL TOPPING
  • 1/4 cup packed brown sugar
  • 5 tablespoons all-purpose flour
  • 1/2 teaspoon ground cinnamon
  • 2 tablespoons cold butter

DIRECTIONS
  1. In a large bowl, combine the flour, sugar, cream of tartar, baking soda and salt. 
  2. In another bowl, combine eggs, yogurt and sour cream; stir into dry ingredients just until moistened. 
  3. Fold in strawberries. 
  4. Fill greased muffin cups two-thirds full.
  5. For topping, combine the brown sugar, flour and cinnamon in a bowl; cut in butter until mixture resembles coarse crumbs. Sprinkle over batter.
  6. Bake at 350° for 30-35 minutes or until a toothpick comes out clean. Cool for 5 minutes before removing from pan to a wire rack. Yield: 6 giant muffins, or 12 regular size.
A couple bites in!

Friday, May 25, 2012

Strawberry Cupcakes

Vanilla Bean Cupcakes, Filled with Strawberry filling, frosted with a Strawberry Buttercream


One of Sean's co-workers had a birthday and requested Strawberry cupcakes, which is great because its Strawberry season now, and I had been craving strawberries!

Now, I made these on a Monday night, and was very tired.... so unfortunately, I only have one picture:


But they were very delicious. The filling was sweet, but it worked well. 

Vanilla Bean Cupcakes (from Cupcake Project)
  • 1 cup sugar
  • 1 T Vanilla Bean Paste
  • 1 3/4 cups flour
  • 1 1/2 teaspoons baking powder
  • 1/2 teaspoon baking soda
  • 1/2 teaspoon salt
  • 1/4 cup unsalted butter, room temperature
  • 2 large eggs, room temperature
  • 1/3 cup full-fat sour cream
  • 1/4 cup canola oil 
  • 1 tablespoon pure vanilla extract
  • 2/3 cup whole milk
  1. Preheat oven to 350 F
  2. In a small bowl, combine sugar and vanilla bean paste. 
  3. Using the back of a spoon, move around the bowl and apply pressure to break up any clumps of seeds and to better infuse the vanilla flavor into the sugar. Set aside.
  4. In a medium-sized mixing bowl or bowl of a stand mixer, mix together cake flour, baking powder, baking soda, and salt.
  5. Add the vanilla bean sugar and mix until well combined.
  6. Add butter and mix on medium-low speed for three minutes. 
  7. In a small mixing bowl, whisk together eggs, sour cream, oil, and vanilla extract until smooth.
  8. Add the egg mixture to the flour mixture and beat on medium speed until just combined.
  9. Slowly add milk and mix on low speed until just combined.
  10. Fill cupcake liners 3/4 full.
  11. Bake for 14-16 minutes
  12. When the cupcakes are done, remove them immediately from the tins and leave them on a cooling rack (or just on your counter if you don't own a cooling rack) to cool.

Strawberry Filling (from Wilton)
This made waaaay too much. I would only make 1/4 or 1/2 for 24 cupcakes
  • 1 pkg (16 ounces) frozen sliced strawberries , packed in sugar and thawed
  • 1/3 cup granulated sugar
  • 3 tablespoons cornstarch
  • 1 teaspoon lemon juice
  1. Drain strawberries; reserving liquid. (I bought a 24oz container and reserved some strawberries and liquid for another time.You will need extra strawberry liquid for the frosting)
  2. Add enough water to liquid to equal 1 1/4 cups. 
  3. In large saucepan, combine strawberry liquid, sugar, cornstarch and lemon juice; mix well. 
  4. Heat and stir until mixture boils and thickens. 
  5. Cool completely. 
  6. Stir strawberries into the cooled mixture. 
  7. Refrigerate until ready to use.
  8. Core the cupcakes (i use my handy corer, which is awesome!)

Strawberry Frosting
I kind of made this up... I used a basic buttercream base to start. (this will frost 12 cupcakes)
  • 2 cups powdered sugar
  • 1/2 cup unsalted butter, room temperature
  • 1 tsp strawberry extract
  • 4-5 Tablespoons of strawberry liquid (reserved from filling) or more to taste
  1. Beat butter and powdered sugar.
  2. Add strawberry extract and beat until combined
  3. Add strawberry liquid and beat until combined and fluffy. 
  4. Add more powdered sugar if frosting is too thin or a T of milk if too thick. 
  5. Pipe onto cupcakes. 

Now, I wasn't there to see the results, but Sean said they got 'rave reviews'. Actually, I frosted half of these with my hot fudge buttercream....like a chocolate covered strawberry...yummy!

Monday, May 14, 2012

What is a Fluffernutter?

Fluffernutter Sandwiches and Cupcakes


Why would you eat PB&J sandwiches when you could eat a Fluffernutter sandwich instead?!? Peanut Butter and Marshmallow sandwiched together, my mouth is watering just thinking about it!

Apparently this concept has been around forever, but I had somehow never heard of it until recently. Actually, I don't think I had even tried marshmallow fluff til I was in college (it still amazes me just how weightless a jar of marshmallow fluff is!). Well, I was bored one night and browsing a bunch cupcake blogs when I came across a Fluffernutter Cupcake and I decided that I just HAD to make them, and pronto!

I mentioned that I was making a Fluffernutter cupcake in passing and got a bunch of 'What is a Fluffernutter?" questions, which made me feel less ridiculous for not knowing what it was before; I was not the only one in the dark.

So, I set out to test the flavors (just to confirm it was as amazing as it sounded). I started with a 1/2 sandwich....then made another 1/2.....and another the next day... I was in love with them!


It was time to take it to the next level.....cupcake form!

This recipe came from a blog called 'How Sweet It Is'. I re-posted the recipe below.

These turned out AMAZING. They tasted just like a nutter butter cookie; the cupcake was dense and the icing was perfectly sweet! The only thing I would do differently is add a bit more fluff to the icing...and fill them with more peanut butter filling.


Fuffernutter Cupcakes
makes about 18 cupcakes
  • 1/4 cup butter, softened
  • 1/2 cup creamy peanut butter
  • 1 cup granulated sugar
  • 2 large eggs
  • 2 teaspoons vanilla extract
  • 1 1/2 cups all-purpose flour
  • 1 1/4 teaspoon baking powder
  • 1/3 cup milk
  • 1/2 cup peanut butter morsels
  • 2/3 cup marshmallow fluff
  1. Preheat oven to 350 degrees F.
  2. Cream butter and peanut butter together in the bowl of an electric mixer until smooth and creamy. 
  3. Add sugar and eggs and beat together until fluffy. 
  4. Add vanilla and mix for another minute or so.
  5. Combine dry ingredients in a bowl. 
  6. Add half of the dry ingredients, mixing until just combined. 
  7. Add the milk. 
  8. Once mixed, add remaining dry ingredients. 
  9. Fold in peanut butter morsels and marshmallow fluff.
  10. Pour into cupcake tins and fill 2/3 of the way full. Bake for 15-18 minutes.

Just baked, can you see the marshmallow swirl?

Peanut Butter Filling
This is so yummy, I ate all the leftovers... 
  • 2 tablespoons butter, softened
  • 1/4 cup creamy peanut butter
  • 1 teaspoon vanilla extract
  • 3/4 cup powdered sugar
  • 1-2 teaspoons milk, if needed
  1. Beat butter and peanut butter in the bowl of an electric mixer until creamy. 
  2. Add in vanilla extract, then with the mixer on low speed, add in powdered sugar.
  3.  Increase speed to medium-high and beat for 2-3 minutes until fully combined, scraping down the sides.
  4. If frosting is too thick, add in milk and beat for 1-2 minutes more. 
  5. Fill the cupcake. (I used Wilton tip 233)

Filling the Cupcake


Marshmallow Buttercream 
  • 1 cup butter (2 sticks), softened
  • 1 tablespoon vanilla extract
  • 1 1/2 cups marshmallow fluff
  • 3 cups of powdered sugar
  1. Beat butter in the bowl of electric mixer until creamy. 
  2. Add in fluff and beat for 2-3 minutes, then add in vanilla extract. 
  3. With the mixer on low speed, add in powdered sugar 1 cup at a time until fully incorporated. 
  4. Once all the sugar has been added, beat on medium-high speed for 2-3 minutes. 
  5. Frost cupcakes and drizzle with melted peanut butter if desired.

I think I should have added more filling...

Thursday, May 3, 2012

Angel Food and Fudge Frosting

Fluffy Angel Food Cupcakes with 'Hot' Fudge Frosting

I made these to take to dinner after my sister's graduation tomorrow. I have been dying to make these angel food cupcakes for weeks!


Both recipes come from different posts from How Sweet It Is:

The cupcakes were a little bit denser than I had hoped, but they were still yummy. The frosting however, was so AMAZING! I think I may have to find another cupcake to put it on... 


Angel Food Cupcakes:
makes 18 cupcakes (adapted for 18, recipe was originally for 36)
  • 6 large egg whites 
  • 3/4 teaspoons cream of tarter
  • 1/3 cup granulated sugar
  • 1 teaspoons vanilla extract
  • 1/2 + 1/3 cups sifted powdered sugar 
  • 1/2 cups sifted cake flour
  • 1/4 teaspoon salt
  1. Let egg whites sit at room temperature for about one hour before beginning. 
  2. While eggs are resting, measure out powdered sugar and flour, then sift powdered sugar, flour and salt together. Set aside. Line a cupcake tin (or two) with cupcake liners.
  3. Preheat oven to 350 degrees F and place rack in the bottom third of oven.
  4. Beat egg whites until frothy. 
  5. Add in cream of tarter, then beat at medium speed until soft peaks form. 
  6. Gradually add granulated sugar with the mixer still on medium speed, continuing to beat until egg whites thicken a bit more with opaque, soft, droopy peaks. 
  7. Once there, beat in vanilla extract.
  8. Remove the bowl from the mixer and sprinkle 1/4 of the dry ingredients over the egg whites. Fold gently with a spatula until combined completely. Continue with the rest of the dry ingredients in increments
  9. Once batter is smooth, use a 1/4 cup measure to pour heaping scoops of batter into each liner. Bake for 18-19 minutes, or until tops are golden brown. Let cool completely, then frost as desired. ( I didn't follow this instruction and probably didn't put enough batter in the cups...they weren't as large as I would have liked)


Hot Fudge Frosting:
This made about twice as much frosting as I needed.... but that's OK. I am saving the rest for another day.
  • 1 cup of butter (2 sticks), softened
  • 3-4 cups of powdered sugar
  • 1/3 cup special dark cocoa powder
  • 1 tablespoon vanilla extract
  • 1/3 cup hot fudge sauce
  • 1-2 tablespoons milk, if needed
  1. In the bowl of an electric mixer, beat butter until smooth. 
  2. Gradually add in powdered sugar about 1/2 cup at a time with the mixer on low, increasing it to medium-high speed once all the sugar has been added. 
  3. Add the cocoa, vanilla and hot fudge, and mix until completely combined. If the frosting seems very thick, add some milk 1 tablespoon at a time and mix until it comes together.
  4. I used Wilton 1E to pipe the frosting.
Yum Yum Yum!


Related Posts Plugin for WordPress, Blogger...