Showing posts with label fruit. Show all posts

Saturday, October 15, 2011

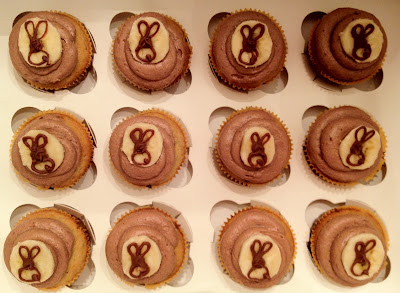
Banana Bunny Cupcakes for Grandma

Banana Cupcakes with Chocolate Banana Frosting


My grandma's birthday is Sunday, so naturally I made her cupcakes! She likes Banana Cake, Chocolate, and Bunnies (especially bunnies)! Here's a cupcake that combines them all.

Banana Cupcakes (From Cupcake Project)
(made 22 cupcakes)

I found this recipe and it appealed to me because it looked super easy, and it was! Pop everything in the mixer and off to the oven they go. The cake was dense, but good, like a very moist banana bread in cupcake form! Goes perfectly with the chocolate banana frosting!
Little Bunny Garnish
  • 1 Stick Butter 
  • 1 C Sugar 
  • 2 Eggs 
  • 1/2 C Sour Cream 
  • 1 tsp baking soda 
  • 2 C flour 
  • 1 tsp vanilla 
  • 2 Bananas, smashed 
  1. Cream Butter and Sugar 
  2. Add Eggs 
  3. Add Sour Cream, Flour, and Baking Soda 
  4. Add vanilla and smashed Bananas 
  5. 5.Bake for 16-18 mins at 350 degrees.
Hop Hop Hop!

Chocolate Banana Frosting (from Love and Olive Oil)
  • 1 cup butter (2 sticks), room temperature 
  • 1/2 cup ripe banana, smashed (about 1 banana) 
  • 4 tablespoons cocoa powder 
  • 4-5 cups confectioners' sugar 
  • 2 teaspoon vanilla extract
  1. Cream butter until smooth and fluffy, 2-3 minutes 
  2. Add banana and mix on high speed until few lumps remain. 
  3. Add cocoa powder and 1 cup powdered sugar and beat until combined. 
  4. Continue adding powdered sugar, 1/2 cup at a time, mixing well after each addition until you reach the desired consistency. 
  5. Mix in vanilla. Continue beating until light and fluffy, about 3-5 minutes, adding more sugar if necessary. 
  6. Pipe onto cooled cupcakes. I used Wilton tip #1A. Garnish with banana slices. 

Pre-Bunny


So cute!
Banana  Garnish

To garnish these cupcakes I took a slice of banana and piped a bunny figure, using Wilton Tip #2 onto each one with melted milk chocolate. 

Every day I wonder why we haven't bought a microwave yet! I am sick of the double boiler! 

Make sure to pop em in the freezer for a few minutes to harden the chocolate. (these are yummy to eat by themselves too!)


The Finished Product
In their 'rabbit hole' off to see Grandma!

Friday, October 14, 2011

White Chocolate Strawberry Cupcakes

White Chocolate Cupcakes with Strawberry Whipped Cream Frosting


My mom and I are off to the wineries in Defiance, MO in the morning and needed a snack to bring along. I have been wanting to try this recipe for White Chocolate Cupcakes for awhile now. The recipe originally called for a Strawberry Buttercream, but I have left-over whipping cream from my 'sturdy' buttercream and it goes bad rather quickly, so I opted to do a strawberry whipped cream frosting instead.

White Chocolate Cupcakes (from Raspberry Eggplant)
(makes 28 cupcakes)
  • 8 ounces good quality white chocolate, chopped (I use Ghirardelli)
  • 2 1/3 cups flour
  • 2 ½ teaspoons baking powder
  • ¼ teaspoon salt
  • ½ cup unsalted butter, room temperature
  • ¾ cup + 2 tablespoons sugar
  • 3 large eggs
  • 1 cup whole milk
  • ½ cup plain low-fat yogurt
  • 1 ½ teaspoons vanilla extract
  1.  Preheat oven to 350°F. 
  2. Melt the white chocolate in a double boiler. 
  3. Sift the flour, baking powder, and salt into a medium bowl and set it aside. Whisk the milk, yogurt, and vanilla into a medium bowl and set it aside.
  4. Beat the butter and sugar on medium speed until light and fluffy, about 3 minutes. Add the eggs one at a time, beating well after each addition. 
  5. Add half of the flour mixture, all of the milk mixture, and the remaining flour mixture, mixing well after each addition. Add the melted white chocolate. Mix on low speed to combine.
  6. Fill cups and bake for 18-20 minutes. Cool the cupcakes in the pan on a wire rack for 10 minutes, then remove the cupcakes and let them sit on the rack until they are completely cooled. 
The cupcakes came out good, but kind of dense. My boyfriend said they are kind of like muffins.

Pretty Little Cupcakes

Strawberry Whipped Cream Recipe (from Cupcake Project)
  • 1 cup heavy whipping cream 
  • 1/3 cup sugar 
  • 4 tablespoons food processed strawberries (take some fresh strawberries, wash them, remove the stems, and throw them in the food processor until they become a thick, seedy liquid) 
  1. Whip cream until it looks like whipped cream. 
  2. Mix in sugar. 
  3. Mix in strawberries until just combined. 
  4. Be sure to frost your cupcakes before you eat all of the strawberry whipped cream.
This was fabulous and simple! It tastes so fresh and light! This made exactly enough to frost 24 cupcakes, so you might want to double it. 

I used tip #2D which was a poor choice, the strawberries kept getting stuck in it!

Look at that Yummy Frosting!

Saturday, October 8, 2011

Mimosa's for Brunch

A.K.A. The Champagne Adventures: Part 3


You might wonder where parts 1 and 2 are, well my adventures with Champagne started several weeks ago with the ‘Strawberries and Champagne’ idea. Sounds perfect right? Well, getting the Champagne part of the equation right proved to be more difficult than expected.

First I tried a Champagne Glaze from the Cupcake Project, but that just made the cupcakes soggy and sticky, not to mention the mess it made of my kitchen!

Then, I tried a different recipe from the Cupcake Project for a Champagne Mascarpone Frosting. It was good, but not great. It didn’t quite taste like Champagne. Probably because it didn’t actually have Champagne in it; Champagne Flavoring was the substitute. It also started to melt off the cupcakes when sitting out on the counter for a couple of hours.

Well, I didn’t want to settle for just a good recipe, so I was still searching for the perfect Champagne frosting. Since my White Wine Cupcakes turned out fantastically, I thought “Why not substitute the wine for Champagne?” I also thought, since Champagne has a weak flavor, I would add a couple drops of the flavoring I had left over. It turned out great! Sweet, with a subtle Champagne flavor and was a stiffer consistency.

Now on to the Mimosas! We had a family brunch (well brunch/lunch...i'm not sure you can call it brunch after 11am) this morning, so I figured Mimosa Cupcakes would go along perfectly. An orange cupcake with Champagne frosting in one hand and a mimosa drink in the other!

Orange Cupcakes (From the Cupcake Project)

These were denser cupcakes, but tasted good. The batter was VERY orange-y, but it baked out to a light orange flavor.

Ingredients:
2/3 C sugar (for the zest)
finely grated zest of 1 orange
1 C orange juice concentrate
1/2 C sugar (for the concentrate)
2 C flour
1 1/2 t baking powder
1/2 t baking soda
3/4 C butter, room temperature
2 eggs
2/3 C plain yogurt

Directions:
1. A few hours before you are ready to bake, combine the orange zest and the sugar in a bowl. This will let the orange flavor infuse into the sugar.

2. While you are waiting, prepare an orange syrup by bringing the orange juice concentrate and sugar to a boil in a saucepan. Stir continuously until it is thoroughly combined and gets slightly thicker (about 10 minutes). Remove from heat and return to room temperature. 

Should look like this:

3. With a fork, whisk flour, baking powder, and baking soda in a bowl.

4. Beat butter and the sugar with grated orange zest in a large bowl for 1 minute, until light and fluffy.

5. Beat in eggs and yogurt until blended.

6. Alternately fold in flour mixture and 2/3 cup of the orange syrup (that should be pretty much all of the syrup) in three additions, beginning and ending with flour.

7. Fill cupcake liners 3/4 full.

8. Bake at 350 F for about 25 minutes or until a toothpick comes out of the cupcake clean.


White Chocolate Champagne Buttercream Frosting (Adapted fromWe are not Martha)

Ingredients:
1 1/2 C unsalted butter, softened
6 oz. white chocolate (I use Ghirardelli Bars)
3 1/2 C powdered sugar
4 teaspoons Champagne (you can add extra to taste)
3 drops Champagne Flavoring (you can order it here)

Directions:

1. Melt white chocolate on the stove in a double boiler

2. Cream the butter at medium speed until it looks light and fluffy (3-4 minutes)

3. Beat in melted white chocolate

4. Add 1/2 C powdered sugar, then 1/2 teaspoon Champagne, making sure each is incorporated before adding the next. Repeat until all the powdered sugar and Champagne are blended in. Add in the Champagne flavoring.

5. If it's too thin, put the bowl of icing in the freezer for 10-15 minutes to thicken it up, and then give it a good beating with the mixer before filling your piping bag.

6. Pipe icing onto cupcakes. I used my mom's new tip # 2D for these.


Friday, September 30, 2011

Apple Pie in Disguise

One of my favorite things about this time of year is Apple Pie! But pie requires a lot more effort to eat and share, you have to have plates, forks, toppings, etc. That's why I love cupcakes, they are so easy to pass around! I stumbled across a recipe from the Craving Chronicles and thought it was a perfect addition to my cupcake recipe collection, with a few modifications. I have posted my edits below so you can enjoy too!

This is probably the MOST labor-intensive cupcake I have ever attempted, but it was soooo worth the effort! I even got compared to a professional baker!


Apple Pie Cupcakes 
makes 24 cupcakes

These consist of several parts:
1) cinnamon-nutmeg cupcakes
2) apple filling
3) vanilla caramel sauce
4) caramel butter-cream frosting

Part 1: The Apple Filling
I chose to make this part first because it needs to cool completely before filling the cupcakes. And frankly, I hate peeling apples, so I figured I would get the worst part out of the way.

Ingredients
2 T unsalted butter, softened
4 apples, I used Johnathan apples (my mom picked them at Eckert's for me)
1T sugar
2 1/2 T dark brown sugar
1 teaspoon lemon juice
1/4 teaspoon cinnamon
1/8 teaspoon nutmeg
1/2 T cornstarch
1T water

Directions
Melt butter in medium saucepan over medium heat, I used a small pot and had some overflowing apples. 
Add Apples, sugars, lemon juice, and spices. 
Cook until apples are tender, it will look watery. It took about 8-10 mins for me.
Combine Cornstarch and water, then add to apple mixture.
Remove from heat and cool to room temperature. 

Part 2: The Dreaded Caramel Sauce
This was my first (and second) attempt at making homemade caramel. I went in thinking "I can do this!", but it did not go well the first time! I figured it though, and ended up with some pretty delicious vanilla caramel sauce.

The recipe originally called for a split vanilla bean, but it was difficult to scrape the seeds out, the seeds went straight to the bottom, and it did not taste very much like vanilla. So, the second time around I just used vanilla extract. 

Ingredients
3/4 C sugar
1 1/4 C heavy whipping cream (room temperature)
2 teaspoons pure vanilla extract

Directions
Mix vanilla with cream. 
Use a very large pot, and spread sugar onto bottom of pot. If the sugar is too deep, it will burn before it melts. 
Stir with a whisk constantly until it starts bubbling. Stop stirring and when it looks the color of one of those square caramel chews and smells of caramel, remove from heat. 
Immediately whisk in vanilla cream mixture until smooth, return to heat if clumps form. Be careful not to overcook the caramel though. This will bubble and be very very hot!
Freeze until you are ready to make the frosting. 

Part 3: The Cupcakes 
(the easiest part)

Ingredients
1 C whole milk
1/2 C unsalted butter, room temperature
2 C flour
1 1/2 teaspoons baking powder
2 1/2 teaspoons ground cinnamon
1 teaspoon nutmeg
1/4 teaspoon salt
4 large eggs
1 3/4 C sugar
1 teaspoon pure vanilla extract


Directions
Preheat oven to 350°F. Line two 12-cup muffin tins with cupcake liners.
Heat milk and butter in a small saucepan over medium heat until butter melts. Remove from heat. 
In a medium bowl, whisk together flour, baking powder, cinnamon, nutmeg and salt.
Using a stand mixer with a whisk attachment, beat eggs and sugar for about 5 minutes. 
Add flour mixture and beat on low just until incorporated. Add milk mixture and vanilla, and beat until blended. 
This will look very liquidy, but they puff up nicely in the oven.
Divide evenly among baking tins. Bake for 16-18 minutes, or until a toothpick comes out clean. Cool in pans until almost cool, then transfer to wire racks to cool completely.

Once cool, use a paring knife to make a cone shape hole in the center of the cupcakes. 
Fill with a spoonful of apple filling. 
Remove the excess cupcake from the 'lids' and replace the top. 

Part 4: Caramel Swiss Meringue Butter-Cream Frosting
Anytime I see the words 'Swiss meringue butter-cream', I cringe a little bit. It's the most time-consuming icing I think there is, but its always delicious! Light, and airy perfection. 

Unfortunately, this will make about 30% more icing than you need. 

Ingredients
6 large egg whites OR 2/3 C plus 1/4 C egg white mixture (I'm too lazy to do it myself!)
1 1/2 C granulated sugar
Pinch of kosher salt (I always wondered why people use kosher salt, now I know: its coarser than normal salt)
3 sticks unsalted butter, cut into cubes
1/2 C Vanilla Caramel sauce (make sure its completely cooled first)
1 tsp vanilla extract

Directions
Place a small saucepan with about an inch or two of water over medium-low heat and bring to a simmer. Combine egg whites, sugar and salt in the metal bowl of a stand mixer. Place bowl over pan of simmering water and whisk constantly until mixture an instant-read thermometer reads 160°F. (It will start to look frothy.) 
Remove bowl from heat and attach to stand mixer. Beat with the whisk attachment until stiff meringue peaks form, about 10 minutes. 
Switch to paddle attachment. On low speed, add one cube of butter at a time, waiting until incorporated before adding the next. 
Once all butter is added, on low speed slowly pour in caramel. Add vanilla and continue beating until smooth. 
Freeze bowl of icing for 15 minutes. Then return to stand for another quick beat. 
Pipe onto cupcakes, I used my Wilton 1M tip.

Drizzle caramel sauce on top and you're ready to enjoy!

For best results, refrigerate overnight and enjoy for breakfast the next morning! :)

Related Posts Plugin for WordPress, Blogger...