Showing posts with label vanilla. Show all posts

Thursday, January 3, 2013

Vanilla Malt Cupcakes

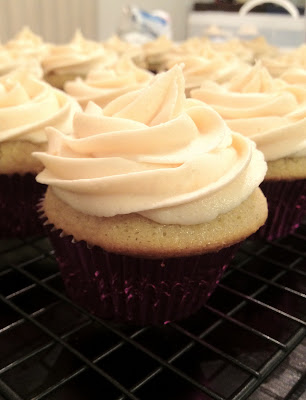
Vanilla Malted Milk Cupcakes with a Whipped Cream Frosting & Chocolate Grad Caps and Scrolls

I made these for my cousin's graduation party...needed 6 dozen cupcakes! But I whipped them out like a champ! I mean besides the miscalculation that ended up with me having twice as many cupcakes as I needed! Oh, well, more for me!

That is a chocolate graduation cap and scroll, in case you can't tell

Everyone LOVED them!

I kind of LOVE this angle!
The Cupcakes had a hint of Vanilla malt in them, and the frosting was light and airy... a perfect compliment!

Top View!
The cupcake recipe is from Paula Deen

Vanilla Malt Cupcakes
Makes about 16 cupcakes

Ingredients
  • ¾ cup sugar
  • ½ cup malted milk powder
  • 1 ¾ cups cake flour, not self-rising
  • 1 ½ teaspoons baking powder
  • ½ teaspoon baking soda
  • ½ teaspoon salt
  • ½ cup unsalted butter, room temperature
  • 1 tablespoon vanilla extract
  • 2 large eggs, room temperature
  • ¾ cup whole milk
Directions:
  1. Preheat oven to 350 F.
  2. In a medium-sized mixing bowl, whisk together sugar, malted milk powder, cake flour, baking powder, baking soda, and salt.
  3. Add butter and vanilla and mix until light and fluffy.
  4. Mix in eggs until just combined.
  5. Slowly mix in milk until just combined.
  6. Fill cupcake liners ¾ full.
  7. Bake for 20 minutes or until cupcakes bounce back when lightly touched.
Just out of the oven!
Whipped Cream Frosting

Ingredients
  • 3 cups heavy or whipping cream 
  • 5 Tbs. granulated sugar 
  • 1-1/2 tsp. vanilla extract
Directions
  1. Chill the bowl and whisk attachment of a stand mixer for 20 min. in the refrigerator or 5 min. in the freezer. 
  2. Pour the heavy cream into the bowl and whisk on medium-high speed until it just starts to thicken. 
  3. Slow the speed down to medium and gradually pour in the sugar. 
  4. Continue to whisk until soft peaks form.
  5. Add the vanilla extract and continue to whisk by hand until the cream is smooth, and stiff peaks form.
This recipe was super easy! You could add a few more Tablespoons of sugar if you wanted. It wasn't too sweet as it is.

Ready to go to the party!

Friday, October 19, 2012

Vanilla Bean & Dark Chocolate

Vanilla Bean Cupcakes with Hershey Special Dark Buttercream Frosting


Sometimes simple is perfect! Especially when its 9:30PM the night before your potluck at work! I almost forgot to make these, and for a split second I considered just buying cupcakes to bring..... don't worry! It was a short split second and I came to my senses!

So my Vanilla Bean Cupcakes are probably my most requested cupcake ever. Its got high quality madagascar bourbon vanilla and vanilla bean paste (that's what makes them so much better than all the other vanilla cupcakes!)


The cupcake recipe originally came from the Cupcake Project, but I have posted it several times in this blog.

Here it is again:


Vanilla Cupcakes (from Cupcake Project)
Yield: 16 cupcakes
  • 1 cup granulated sugar 
  • 1 T vanilla bean paste 
  • 1 3/4 cake flour 
  • 1 1/2 teaspoons baking powder
  • 1/2 teaspoon baking soda 
  • 1/2 teaspoon salt 
  • 1/4 cup unsalted butter, room temperature 
  • 2 large eggs, room temperature 
  • 1/3 cup full-fat sour cream 
  • 1/4 cup canola oil 
  • 1 tablespoon pure vanilla extract 
  • 2/3 cup whole milk 
1. Preheat oven to 350 F

2. In a small bowl, combine sugar and vanilla bean paste

3. Mix together cake flour, baking powder, baking soda, and salt.

4. Add the vanilla sugar and mix until well combined.

5. Add butter and mix on medium-low speed for three minutes.

6. In a small mixing bowl, whisk together eggs, sour cream, oil, and vanilla extract until smooth.

7. Add the egg mixture to the flour mixture and beat on medium speed until just combined.

8. Slowly add milk and mix on low speed until just combined.

9. Fill cupcake liners 1/4 of the way up. Place a mini-cupcake on top, cover with additional batter.

10. Bake for 14 minutes

11. When the cupcakes are done, remove them immediately from the tins.

Mmmm fresh out of the oven!
And here is the Chocolate frosting. Sean really wanted them to have this frosting (it is his favorite of all time!)

It originally came from Martha Stewart, but I have tweaked it some.

Dark Chocolate Frosting
This makes enough to frost about 25-30 cupcakes depending on how much you use on each cupcake.... I put the left-over frosting in the fridge so I can use it again this weekend.... maybe I will try and send Ben some more cupcakes!

  • 4 1/2 cups powdered sugar
  • 1 cup Hershey's Special Dark cocoa powder
  • 12 tablespoons (1 1/2 sticks) unsalted butter, room temperature
  • 1/2 cup whole milk, room temperature
  • 2 teaspoons pure vanilla extract
  1. Combine the powdered sugar and cocoa powder
  2. Add the butter, milk, and vanilla
  3. Beat until Smooth
  4. Add more powdered sugar if frosting is too thin.
  5. Pipe onto dipped cupcakes (I used my Wilton #1M tip)

And of course I have to test one.... or three... to make sure they are good!

The best part about these was it only took about 45 mins from start to finish...including cool-down time! Fast, Easy, Simple.... and still Delicious!

Monday, September 3, 2012

Cute Kitty Cupcakes

Kitty cupcakes modeled after Hello, Cupcake's "Fat Cats Cupcakes". I don't have the book, so I was reading it on Google Books here.


Aren't they just so cute??

The gray one is my favorite!

But the orange one is cute too...this one has a messed up eye though :(

So, here is what you'll need:

my basket at Schnucks....got some weird look at 8am with only candy!

  • Basic Chocolate Cupcake -- I used a VERY easy recipe from Baking Bites. I halved the recipe to only make 12 cupcakes. 
  • 2 Jars of Vanilla Icing -- I usually hate pre-made frosting, but that is what the book called for. And it was so much work putting them together, I just went with the easy pre-made stuff. 
  • Red, Yellow, and Black food coloring. I use Wilton's colors.
  • Famous Chocolate Wafers -- I had no idea what these were. Turns out they are like oreo's without the filling. These are for the ears. 
  • 2 packages of mentos -- for the face
  • 1 box of runts -- you only need the heart shaped ones for the nose
  • 1 package of starburst -- you only need 3 red ones for the tongues
  • Black gel icing to draw the sleeping eyes

Ready for the instructions? It really wasn't too hard at all!

STEP 1: Bake 12 chocolate cupcakes. Any recipe will work. Here is the one I used

MMM, yummy! And it make exactly 12 cupcakes

STEP 2: Make up your icing. Take 1 cup of icing and place it in a piping or ziploc bag. This will be for the face. Divide the remaining icing into two bowls and tint one gray (using a little bit of black coloring), and the other one orange (using red and yellow coloring). These will be for the fur. Place each color into its own piping or ziploc bag. 

Note: Use only a little bit of black coloring, and let sit for 10 minutes. The black coloring will darken up over time, so be careful not to add to much at the beginning.

Then Snip 1/8 inch off the corner of each bag.


STEP 3:  Carefully using a serrated knife, make 2 parallel vertical cuts into the wafer cookies about 3/4 of an inch from the edges. This will leave 2 curved pieces that will become the ears. You will need to cut up 12 cookies (or more if the cookies break..... I think I went through like 25 or 30 cookies!)

The pieces you need look like this:


STEP 4:  Attach the cookie ears to the cupcakes using a little bit of icing. They should be sticking about an inch over the edge of the cupcakes. 

Like this:

At this point, I was afraid they would look more like bunnies than kitties!

STEP 5: Time to add some fur! Start by piping lines of frosting onto the ears. Then work your way around the edges of the face, moving inward. Squeeze the frosting onto the cupcake, and quickly pull away so that it makes little tufts of fur. Repeat around the whole face, overlapping the fur as you move inward. But make sure to leave a circle un-frosted at the base for the face. 


Repeat the same process with the white, filling in the gap you left. The white should overlap on top of the orange/gray fur. 

STEP 6: Prepare the face accents:
  1. Make sure you have 24 mentos (which is 2 packs). I only bought 1 pack, and had to make a run to the store for more!
  2. Dig 12 red runt hearts out of the huge box you got. 
  3. Hope that your starburst package has at least 3 red starburst in it. Mine had exactly 3.
  4. Cut each red starburst into quarters. Pop into the microwave for 5 seconds, then mold into little teardrop shapes for the tongues.
So Many Runts!

STEP 7:  Assemble the Kitties!
  1. Place 2 mentos side by side on the white section of your kitty. 
  2. Place a red heart above the mentos for the nose
  3. Place the teardrop shaped starburst below the mentos, with the skinny side at the top for the tongue. 
  4. Using the black gel icing, draw 2 sleepy eyes above the white section of the face. 
  5. Step back and admire your work!

The book also made some of them with mini m&ms for eyes, but I thought the sleepy eyes were cuter, so I made them all sleeping :)


Now, I know its hard to believe because these are so adorable, but Sean does not want to take them to work!! He is "Too Embarrassed" by their cuteness!


Oh well, I guess I will have to find someone else to share them with! I don't think anyone else would complain about them  ;)

So many kitties!


Friday, February 17, 2012

Chocolate Filled Vanilla Cupcakes


I got a request this week for some going-away party cupcakes for my mom's work. Of course, everyone requested the Chocolate Xtreme Cupcakes, but my mom is a vanilla-lover so I had to make some of those too.

Well, I thought vanilla on vanilla was too plain, so I searched the web for a chocolate filling that looked like it wouldn't be too sweet or too chocolaty. And I stumble on the below filling recipe from EvilShenanigans.


Now, these only turned out kinda ugly because I spent all my energy on these pretty little things:


Vanilla Cupcakes (from Cupcake Project)
Yield: 16 cupcakes
  • 1 cup granulated sugar 
  • 1 T vanilla bean paste 
  • 1 3/4 cake flour 
  • 1 1/2 teaspoons baking powder
  • 1/2 teaspoon baking soda 
  • 1/2 teaspoon salt 
  • 1/4 unsalted butter, room temperature 
  • 2 large eggs, room temperature 
  • 1/3 cup full-fat sour cream 
  • 1/4 cup canola oil 
  • 1 tablespoon pure vanilla extract 
  • 2/3 cup whole milk 

  1. Preheat oven to 350 F
  2. In a small bowl, combine sugar and vanilla bean paste
  3. Mix together cake flour, baking powder, baking soda, and salt.
  4. Add the vanilla sugar and mix until well combined.
  5. Add butter and mix on medium-low speed for three minutes.
  6. In a small mixing bowl, whisk together eggs, sour cream, oil, and vanilla extract until smooth.
  7. Add the egg mixture to the flour mixture and beat on medium speed until just combined.
  8. Slowly add milk and mix on low speed until just combined.
  9. Fill cupcake liners 1/4 of the way up. Place a mini-cupcake on top, cover with additional batter.
  10. Bake for 14 minutes
  11. When the cupcakes are done, remove them immediately from the tins.


Chocolate Filling (from EvilShenanigans)
This makes enough to fill about 18 cupcakes, even though it doesn't look like enough after you mix it all up.
  • 1 teaspoon water, hot
  • 3 1/2 ounces marshmallow fluff
  • 1/4 cup vegetable shortening
  • 3 tablespoons powdered sugar
  • 2 tablespoons Dutch-processed cocoa powder
  • 1/2 teaspoon vanilla
  1. Combine all ingredients in a small bowl. 
  2. Use a cupcake corer to remove the core. If you don't have a corer, use a paring knife to cut a cone out of the center. 
  3. Spoon some chocolate filling into the cored cupcake. 
  4. Frost and enjoy!
Filling them was kinda messy! (I blame marshmallow fluff...so sticky!)


Vanilla Frosting (from Cupcake Project)
If you like a lot of frosting, you will need to double this as it barely frosted 15 cupcakes.
  • 3 cups confectioners' sugar (add more until it reaches your preferred consistency) 
  • 1cup unsalted butter, room temperature 
  • 4 teaspoons vanilla bean paste (add more to taste) 
  • 2 tablespoon milk 
  1. Mix together sugar and butter until they are blended and creamy.
  2. Add vanilla bean paste and milk and continue to beat for another minute.
  3. If desired, add more vanilla bean paste to taste, or more confectioners' sugar to make it stiffer

The Finished Product
Overall, this cupcake was delicious! And everyone loved them! The chocolate filling was perfect, just enough chocolate flavor to kick the plain old vanilla cupcakes up a notch!

Thursday, December 1, 2011

Christmas Party Cupcakes

Vanilla Frosted Vanilla Cupcake Garnished with a Mini Tree Cookie


My company's annual Christmas Party is happening this weekend, so I decided to make Christmas cupcakes (only because my traditional Christmas cookies are not baked yet and I made a bunch of pies last week for Thanksgiving).

Well, I calculated that I would need about 75 cupcakes (its going to be a big crowd this year!). I don't have the energy to make them all complicated cupcakes, so I originally decided to keep it simple. I was just going to do vanilla with vanilla buttercream.

Then I got bored after work this week ....and made little tree roll-out cookies and iced them with green colored color-flow icing. The next day, I was bored again after work and decided to whip up a batch of buttercream so I could pipe garland and ornaments onto the tiny trees. I debated also putting a little star sprinkle at the top, but I didn't have enough of them and hate going to the grocery store!

I made this recipe from allrecipes.com:
  • 3/4 cup butter, softened
  • 1 cup white sugar
  • 2 eggs
  • 1/2 teaspoon vanilla extract
  • 2-1/2 cups all-purpose flour
  • 1 teaspoon baking powder
  • 1/2 teaspoon salt
  1. In a large bowl, cream together butter and sugar until smooth. Beat in eggs and vanilla. Stir in the flour, baking powder, and salt. Cover, and chill dough for at least one hour (or overnight).
  2. Preheat oven to 400 degrees F . Roll out dough on floured surface 1/4 to 1/2 inch thick. Cut into shapes with any cookie cutter. Place cookies 1 inch apart cookie sheets. (I never leave that much space, they don't spread out hardly at all)
  3. Bake 6 to 8 minutes, mine took closer to 6 mins.
Icing - follow the instructions that come with the color-flow mix, you can get it at Michael's or here.

Finished Little Tree Cookies
I made the Cupcake Project's Vanilla Cupcake with Vanilla Buttercream Icing. The recipes are re-posted below(with my edits because I don't like using real vanilla beans). This recipe is Amazing, the best vanilla recipe ever!

Vanilla Cupcakes (from Cupcake Project)
Yield: 16 cupcakes
  • 1 cup granulated sugar 
  • 1 T vanilla bean paste 
  • 1 3/4 cake flour 
  • 1 1/2 teaspoons baking powder
  • 1/2 teaspoon baking soda 
  • 1/2 teaspoon salt 
  • 1/4 unsalted butter, room temperature 
  • 2 large eggs, room temperature 
  • 1/3 cup full-fat sour cream 
  • 1/4 cup canola oil 
  • 1 tablespoon pure vanilla extract 
  • 2/3 cup whole milk 
1. Preheat oven to 350 F

2. In a small bowl, combine sugar and vanilla bean paste

3. Mix together cake flour, baking powder, baking soda, and salt.

4. Add the vanilla sugar and mix until well combined.

5. Add butter and mix on medium-low speed for three minutes.

6. In a small mixing bowl, whisk together eggs, sour cream, oil, and vanilla extract until smooth.

7. Add the egg mixture to the flour mixture and beat on medium speed until just combined.

8. Slowly add milk and mix on low speed until just combined.

9. Fill cupcake liners 1/4 of the way up. Place a mini-cupcake on top, cover with additional batter.

10. Bake for 14 minutes

11. When the cupcakes are done, remove them immediately from the tins.

Vanilla Frosting (from Cupcake Project)
  • 3 cups confectioners' sugar (add more until it reaches your preferred consistency) 
  • 1cup unsalted butter, room temperature 
  • 4 teaspoons vanilla bean paste (add more to taste) 
  • 2 tablespoon milk 
1. Mix together sugar and butter until they are blended and creamy.

2. Add vanilla bean paste and milk and continue to beat for another minute.

3. If desired, add more vanilla bean paste to taste, or more confectioners' sugar to make it stiffer

All the cupcakes on display for the party!


Wednesday, November 23, 2011

Cupcakes in Cupcakes!

My latest creation was baking chocolate iced chocolate cupcakes into vanilla iced vanilla cupcakes! It turned out well:


The cupcakes tasted delicious! The chocolate cupcake was the perfect center to a vanilla cupcake!

Mini Chocolate Cupcakes (from Martha Stewart)
Yield: Makes 18 to 24 full cupcakes (you can cut this in half)
  • 3/4 cup unsweetened cocoa powder 
  • 1 1/2 cups all-purpose flour 
  • 1 1/2 cups sugar 
  • 1 1/2 teaspoons baking soda 
  • 3/4 teaspoon baking powder 
  • 3/4 teaspoon salt 
  • 2 large eggs 
  • 3/4 cup warm water 
  • 3/4 cup buttermilk 
  • 3 tablespoons canola oil 
  • 1 teaspoon pure vanilla extract 
1. Preheat oven to 350 degrees. Line standard muffin tins with paper liners; set aside. Sift together cocoa powder, flour, sugar, baking soda, baking powder, and salt into a large bowl. Add eggs, warm water, buttermilk, oil, and vanilla, and mix until smooth, about 3 minutes. Scrape down the sides and bottom of bowl to assure batter is well mixed.

2. Divide batter evenly among muffin cups, filling each 2/3 full. Bake until tops spring back when touched, about 20 minutes, rotating pan once if needed. Transfer to a wire rack; let cool completely.

Chocolate Frosting (adapted from Martha Stewart)
  • 2 1/4 cups powdered sugar 
  • 1/2 cup Hershey's Special Dark cocoa powder 
  • 6 tablespoons (3/4 stick) unsalted butter, room temperature 
  • 1/4 cup whole milk, room temperature 
  • 1 teaspoons pure vanilla extract 
1. Combine the powdered sugar and cocoa powder

2. Add the butter, milk, and vanilla

3. Beat until Smooth

4. Add more powdered sugar if frosting is too thin 

5. Freeze thoroughly

Mini Cupcakes (they stuck to the wrappers a bit)
These mini cupcakes paired with the dark chocolate buttercream were divine on their own!

Vanilla Cupcakes (from Cupcake Project)
Yield: 16 cupcakes
  • 1 cup granulated sugar 
  • 1 T vanilla bean paste 
  • 1 3/4 cake flour 
  • 1 1/2 teaspoons baking powder
  • 1/2 teaspoon baking soda 
  • 1/2 teaspoon salt 
  • 1/4 unsalted butter, room temperature 
  • 2 large eggs, room temperature 
  • 1/3 cup full-fat sour cream 
  • 1/4 cup canola oil 
  • 1 tablespoon pure vanilla extract 
  • 2/3 cup whole milk 
1. Preheat oven to 350 F

2. In a small bowl, combine sugar and vanilla bean paste

3. Mix together cake flour, baking powder, baking soda, and salt.

4. Add the vanilla sugar and mix until well combined.

5. Add butter and mix on medium-low speed for three minutes.

6. In a small mixing bowl, whisk together eggs, sour cream, oil, and vanilla extract until smooth.

7. Add the egg mixture to the flour mixture and beat on medium speed until just combined.

8. Slowly add milk and mix on low speed until just combined.

9. Fill cupcake liners 1/4 of the way up. Place a mini-cupcake on top, cover with additional batter.

10. Bake for 14 minutes

11. When the cupcakes are done, remove them immediately from the tins.

Vanilla Frosting (from Cupcake Project)
  • 3 cups confectioners' sugar (add more until it reaches your preferred consistency) 
  • 1cup unsalted butter, room temperature 
  • 4 teaspoons vanilla bean paste (add more to taste) 
  • 2 tablespoon milk 
1. Mix together sugar and butter until they are blended and creamy.

2. Add vanilla bean paste and milk and continue to beat for another minute.

3. If desired, add more vanilla bean paste to taste, or more confectioners' sugar to make it stiffer

Big and Little Cupcakes

Wednesday, November 9, 2011

Dulce De Leche Cupcakes

Vanilla Bean Cupcake, Filled with Dulce de Leche, Frosted with a Dulce de Leche Buttercream


I am usually not a think-ahead kind of person when it comes to cupcakes. I usually think up an idea and do it right away. Well, this recipe calls for at least 8 hours of planning ahead, the time it takes to make Dulce de Leche.

I, like a lot of people, always thought Dulce de Leche and Caramel were one in the same. However, they are actually 2 different things. Caramel is made out of heated sugar. Dulce de Leche is made out of heated sweetened milk, but they have a similar taste and texture.

Making Dulce de Leche was actually quite easy. Instead of making it the traditional way of constantly stirring a pot of milk and sugar on the stove, I put 2 cans of Sweetened Condensed Milk in a crock pot, set it on low with and 8 hour timer and went to work. When I came home, I had 2 cans of delicious Dulce de Leche, which I could literally eat with a spoon it was so good!

Step 1: Make the Dulce de Leche (you will need 8 hours). I got this idea from the Cupcake Project.

In the Crock Pot
  1. Remove the labels from 2 cans of sweetened condensed milk
  2. Place in a crock pot and cover completely in water. This is important, if its not covered in water, the cans will explode. 
  3. Set it on low for 8 hours and wait. 
  4. Make sure the cans are cooled before opening to reveal the goodness inside. 

Yummy Dulce de Leche!


Step 2: Make the Cupcakes. I am taking this opportunity to try a recipe from my favorite blog (the Cupcake Project)

Vanilla Bean Cupcakes (adapted from cupcake project) I multiplied the recipe by 1.5 so it makes 24 cupcakes. 
  • 1 1/2 cups sugar
  • 1 1/2 T vanilla bean paste (because I don't have vanilla beans)
  • 2 2/3 cups cake flour, not self-rising
  • 2 1/4 teaspoons baking powder
  • 3/4 teaspoon baking soda
  • 3/4 teaspoon salt
  • 6 T unsalted butter, room temperature
  • 3 large eggs, room temperature
  • 1/2 cup full-fat sour cream
  • 6 T canola oil 
  • 1 1/2 T pure vanillla extract
  • 1 cup whole milk
  1. Preheat oven to 350 F
  2. In a small bowl, combine sugar and vanilla bean paste
  3. Mix together cake flour, baking powder, baking soda, and salt.
  4. Add the vanilla sugar and mix until well combined.
  5. Add butter and mix on medium-low speed for three minutes. 
  6. In a small mixing bowl, whisk together eggs, sour cream, oil, and vanilla extract until smooth.
  7. Add the egg mixture to the flour mixture and beat on medium speed until just combined.
  8. Slowly add milk and mix on low speed until just combined. 
  9. Fill cupcake liners just over 1/2 full.
  10. Bake for 14 minutes
  11. When the cupcakes are done, remove them immediately from the tins.
Baking in the Oven, I think I need to clean the glass!

Step 3: Make the Frosting (adapted from the Culinary Chronicles), I found the recipe whilst searching for a frosting in which to add my Dulce de Leche. 

Dulce de Leche Buttercream
  • 6 cups powdered sugar
  • 1 cup unsalted butter (room temperature)
  • 5 Tablespoons Dulce de Leche
  • 3 T Heavy Cream
  1. Beat the butter until light and fluffy. 
  2. Slowly add in the powdered sugar. 
  3. Add the Dulce de Leche and Cream and beat until combined. 
  4. Pipe onto cupcakes (I used Tip #1M)
The inside, showing the ooey gooey goodness!

These were a very very sweet cupcake! But the recipe is definitely a keeper! Also, as ususal, this cupcake is best after refrigerating for a few hours, the Dulce de Leche stays soft and gooey and the buttercream firms up perfectly!

I'd say these were a hit, everyone kept coming back for more!

Saturday, October 22, 2011

Halloween Funfetti Cupcakes

I have always loved funfetti cake mixes, especially when its the holiday versions! But I just had to doctor it up a bit this year.


I got this recipe from the Cake Mix Doctor forums, the cake turned out very light and fluffy! I got 28 out of this recipe.

Erin's Not so Plain Vanilla Cake
1 box Halloween funfetti cake mix
1 box vanilla instant pudding
1 cup vanilla yogurt
1/2 cup vegetable oil
1/2 cup milk
4 eggs
1 tsp vanilla extract

Mix together, then beat on medium for 2 minutes. Bake at 350 degrees for 17-19 minutes.

I got these really cute decorations at Micheal's:


Ice with Funfetti Icing. Add about 3/4 cup of powdered sugar and whip up in the mixer. I piped on with tip 2D. Then add the sprinkles.

NOTE: You need 2 containers of Funfetti icing per batch of cupcakes. I didn't realize this until I iced about 3/4 of the cupcakes. A quick run to Dierbergs, just to find out the don't have the Halloween Funfetti! I got a regular Funfetti and colored it orange, a big hassle, but I was able to match the color almost perfectly!

This was extremely simple, but delicious!


Saturday, October 15, 2011

Cute Little Doughnuts

Vanilla Bean Doughnuts with Pink Sugar Glaze

OK, so these aren't cupcakes, but they are sooo cute! I got a doughnut pan on a whim at Bed, Bath, and Beyond one day and have been waiting for a time to use it. I got up early this morning and decided to try it out. 


Yield: 1 dozen donuts

Doughnuts (adapted from Sprinkle Bakes)
  • 1 cups flour 
  • 6 T sugar 
  • 1 tsp. baking powder 
  • 1/4 tsp. salt 
  • 6 T buttermilk 
  • 1/2 tsp. plus ½ Tablespoon vanilla bean paste 
  • 1 egg, lightly beaten 
  • 1 T butter, melted 
1. Preheat oven to 425°F. Spray donut pan with nonstick cooking spray.

2. In large mixing bowl, sift together flour, sugar, baking powder and salt.

3. Add buttermilk, eggs, vanilla extract, vanilla seeds and butter and beat until just combined.

4. Fill each donut cup approximately 1/2 full. (its easiest if you use a piping bag)

5. Bake 5 minutes or until the top of the donuts spring back when touched.

6. Let cool in pan for 5 minutes before removing.

7. Finish doughnuts with vanilla glaze and sprinkles 

Into the oven they go
And out they come!
Pink Vanilla Glaze: 
  • 1 1/2 cups powdered sugar 
  • 1 1/2 T milk 
  • ½ tsp. vanilla bean paste 
  • 4 drops of liquid red food coloring 
  • Pink Sprinkles 

1. In small bowl, stir together sugar, milk and vanilla extract until sugar is completely dissolved.

2. Add food coloring and stir until color is uniform.

3. Dip cooled donuts into glaze, lift and twist out.

4. Let drip on cooling rack with parchment paper beneath.

5. Sprinkle on the sprinkles.

Complete with Glaze and Sprinkles!

This recipe was super easy, and the Doughnuts taste great! I'm gonna have to make this a weekend morning routine! : )
Related Posts Plugin for WordPress, Blogger...