Showing posts with label white chocolate. Show all posts

Monday, April 30, 2012

Triple Chocolate Mousse Cake

3 layers of chocolaty goodness:

Bottom: Flour-less Chocolate Cake
Middle: Dark Chocolate Mousse
Top: White Chocolate Mousse


I made this cake for my boyfriend's mom's b-day. Since I usually don't have the opportunity to make a non-cupcake dessert I was excited to be able to make a cake! She (like me) loves chocolate, so this recipe was perfect!

It originally called for a 9.5 inch spring-form pan and said it served 12-16. Since there were only 4 of us, I cut the recipe in half and used an 8" pan, which I got from Williams-Sonoma while picking up a gift card. I never leave that store empty handed. : )

After using my brand-new $48 spring-form pan, I decided that I wish ALL my baking supplies came from Williams-Sonoma.....if only I could afford that!

All finished in the pan

Bottom Layer - Flour-less Chocolate Cake:
This was the first time I have ever tried to make a flour-less chocolate cake. The recipe said that it would fall after baking, and boy did it! It came out of the oven about 3-4 inches high and shrunk down to about an inch tall after cooling. Had the recipe not warned me, I would have freaked out a bit!

Now, this cake almost didn't make it into the oven....as it was pre-heating all the way up to 425, Sean was enjoying the left-over batter. Maybe enjoying it a little too much, as he knocked the cake pan off of the counter while trying to lick the bowl clean! Lucky for me, he has quick reflexes and caught the pan just before it splattered onto the floor! Phew!
  • 3 tablespoons unsalted butter, cut into 3 pieces, plus extra for greasing pan
  • 3.5 ounces bittersweet chocolate, chopped fine (I used Ghirardelli)
  • 1/3 teaspoon instant espresso powder
  • 3/4 teaspoons vanilla extract
  • 2 large eggs , separated
  • Pinch table salt
  • 2.5 Tablespoons packed light brown sugar, crumbled with fingers to remove lumps
  1. Adjust oven rack to middle position and heat oven to 325 degrees. 
  2. Butter bottom and sides of 8-inch spring-form pan. 
  3. Melt butter, chocolate, and espresso powder in large heatproof bowl set over saucepan filled with 1 inch of barely simmering water, stirring occasionally until smooth. Remove from heat and cool mixture slightly, about 5 minutes. 
  4. Whisk in vanilla and egg yolks; set aside.
  5. In stand mixer fitted with whisk attachment, beat egg whites and salt at medium speed until frothy, about 30 seconds. 
  6. Add half of brown sugar and beat until combined, about 15 seconds. 
  7. Add remaining brown sugar and beat at high speed until soft peaks form when whisk is lifted, about 1 minute longer, scraping down sides halfway through. 
  8. Using whisk, fold one-third of beaten egg whites into chocolate mixture to lighten. 
  9. Using rubber spatula, fold in remaining egg whites until no white streaks remain. 
  10. Carefully transfer batter to prepared springform pan, gently smoothing top with offset spatula.
  11. Bake until cake has risen, is firm around edges, and center has just set but is still soft (center of cake will spring back after pressing gently with finger), 13 to 18 minutes. 
  12. Transfer cake to wire rack to cool completely, about 1 hour. (Cake will collapse as it cools.) Do not remove cake from pan.
Yummy cake, just waiting to be cut and devoured!

Middle Layer - Dark Chocolate Mousse
This part was so yummy! Could eat it plain with a spoon!
  • 1 tablespoon cocoa powder (I used Ghirardelli)
  • 2.5 tablespoons hot water
  • 3.5 ounces bittersweet chocolate, chopped fine (I used Ghirardelli)
  • 3/4 cups cold heavy cream
  • 1/2 tablespoon granulated sugar
  • pinch of table salt
  1. Combine cocoa powder and hot water in small bowl; set aside. 
  2. Melt chocolate in large heatproof bowl set over saucepan filled with 1 inch of barely simmering water, stirring occasionally until smooth. Remove from heat and cool slightly, 2 to 5 minutes.
  3. In clean bowl of stand mixer fitted with whisk attachment, whip cream, granulated sugar, and salt at medium speed until mixture begins to thicken, about 30 seconds. Increase speed to high and whip until soft peaks form when whisk is lifted, 15 to 60 seconds.
  4. Whisk cocoa powder mixture into melted chocolate until smooth. 
  5. Using whisk, fold one-third of whipped cream into chocolate mixture to lighten. 
  6. Using rubber spatula, fold in remaining whipped cream until no white streaks remain. 
  7. Spoon mousse into spring-form pan over cooled cake and gently tap pan on counter 3 times to remove any large air bubbles; gently smooth top with offset spatula. Wipe inside edge of pan with damp cloth to remove any drips. Refrigerate cake at least 15 minutes while preparing top layer.
We ended up eating exactly half of the cake

Top Layer - White Chocolate Mousse
  • 1/3 teaspoon powdered gelatin
  • 1/2 tablespoon water
  • 3 ounces white chocolate chips (I used Ghirardelli Chips)
  • 3/4 cup cold heavy cream
  • Grated bittersweet chocolate (used as garnish)
  1. In small bowl, sprinkle gelatin over water; let stand at least 5 minutes. 
  2. Place white chocolate in medium bowl. 
  3. Bring ½ cup cream to simmer in small saucepan over medium-high heat. 
  4. Remove from heat; add gelatin mixture and stir until fully dissolved. 
  5. Pour cream mixture over white chocolate and whisk until chocolate is melted and mixture is smooth, about 30 seconds. 
  6. Cool to room temperature, stirring occasionally, 5 to 8 minutes (mixture will thicken slightly).
  7. In clean bowl of stand mixer fitted with whisk attachment, whip remaining cup cream at medium speed until it begins to thicken, about 30 seconds. Increase speed to high and whip until soft peaks form when whisk is lifted, 15 to 60 seconds. 
  8. Using whisk, fold one-third of whipped cream into white chocolate mixture to lighten. 
  9. Using rubber spatula, fold remaining whipped cream into white chocolate mixture until no white streaks remain. 
  10. Spoon white chocolate mousse into pan over middle layer. Smooth top with offset spatula. 
  11. Return cake to refrigerator and chill until set, at least 2½ hours.
  12. Garnish with grated chocolate just before serving. 
You can see the 3 layers in this pic!
Now, my cuts are messy because I didn't follow the instructions. I was supposed to cut this with a cheese wire, but who has one of those!?!

This dessert would go perfectly at a restaurant, very elegant! (minus the rough cuts)

Sunday, February 12, 2012

Another Twist on Red Velvet Cupcakes!

Red Velvet Cake Layered with White Chocolate Cheesecake Topped with Cream Cheese Icing


I have a thing for Red Velvet Cake, but for some reason, I always need to change it up a bit, plain red velvet just isn't quite good enough. (See my Black Velvet Cupcakes and Southern Comfort Red Velvet Cupcakes).


Well, for valentine's day I had to make Red Velvet Cupcakes, but I decided that white chocolate would go well with Red Velvet. So, I went searching for a white chocolate red velvet cupcake and I found this recipe: Red Velvet White Chocolate Cheesecake Cupcakes from the Real Women of Philadelphia.

I altered it a bit, the changes are reflected below. I also found these cute chocolate mold on Amazon a few weeks ago: heart mold. They were supposed to be pink, but of course Wal-Mart only had Red and Orange candy melts, so red they were.


They actually turned out super cute! and delicious too!

The makes 12 cupcakes. Pre-heat oven to 350 degrees. 

White Choc. Cheesecake Batter:
  • 8 ounces of cream cheese, (room temperature)
  • 1/2 cup of sugar
  • 3 tbsp. of beaten egg 
  • 1 tbsp. of vanilla extract
  • 1/2 cup of white chocolate chips
  1. Combine cream cheese with sugar, beaten egg, vanilla until thoroughly blended. 
  2. Add in white chocolate chips and set aside. 
Red Velvet Cake Batter:
  • 1 cup of flour
  • 1/3 cup of cocoa powder
  • 1/2 tsp. of salt
  • 2/3 cup of canola oil
  • 3/4 cup of sugar
  • 1 egg, beaten
  • 1 1/2 tbsp. of red food coloring
  • 1/2 tsp. of vanilla extract
  • 1/2 tsp. of baking soda
  • 3/4 tsp. of white balsamic vinegar
  • 1/2 cup of buttermilk
  1. Sift the flour, cocoa and salt together.
  2. In a large bowl, blend the oil and sugar together then add the egg and mix well. 
  3. Add the red food color, mix carefully then add the vanilla and stir in.
  4. Add one third of the flour mix, stir to just blend.
  5. Add half of the buttermilk and another third of the flour mix and stir until just blended.
  6. Add the other half of the buttermilk and the remaining flour and stir until just blended.
  7. Mix the baking soda and vinegar together in a small dish (it should foam up) and the add to the batter stirring to make sure all dry ingredients have been combined.
Cream Cheese Icing:
  • 12 ounces cream cheese (1.5 8 oz. blocks)
  • 4 tbsp. of unsalted butter, room temperature
  • 2 tbsp. of crisco
  • 2 tsp. of vanilla extract
  • 4 cup of powdered sugar
  • 1 tsp. of buttermilk
  1. Combine butter with the crisco until completely blended.
  2. Add the vanilla and mix well.
  3. Add 1/2 of an 8 oz block of cream cheese and 1 cup of confectioner's sugar
  4. Add 1/2 tsp buttermilk, 1/2 of an 8 oz.block of cream cheese and one cup of confectioner's sugar
  5. Add 1/2 tsp buttermilk, 1/2 of an 8 oz.block of cream cheese and one cup of confectioner's sugar
  6. Add an additional cup of powdered sugar or more until you reach the desired consistency.
Kind of a bad picture, but you can see the layered cheesecake!

To assemble:
  1. Line a muffin tin with liners
  2. Spoon 1 heaping Tablespoon of Red Velvet Batter into each cup. 
  3. Then Spoon 1 heaping Tablespoon of Cheesecake into each cup.
  4. Top with another heaping Tablespoon Red Velvet Batter. 
  5. Bake 23 minutes in 350 degree oven. 
  6. Rest in pan for 5 minutes then remove from pan and place in freezer for 5 minutes. 
  7. let cool the rest of the way on a wire rack and frost with icing. 
  8. top with a candy molded heart pick. 

These turned out great! Recipe is definitely a keeper and Sean's co-workers are lucky this Valentine's Day!

Actually, Sean rates all my cupcakes on a scale of 1 to 10, and these earned a 9! Just below my Chocolate Xtreme Cupcakes!


Saturday, November 5, 2011

Ghirardelli Truffle Cupcakes

Dark Chocolate Cupcake, filled with a Homemade Milk Chocolate Truffle, topped with a White Chocolate Buttercream. 


I recently took a road trip up to Milwaukee to get a car with my boyfriend. On the way back, we decided to stop in and do some outlet shopping. After visiting the Coach and other outlets, we discovered the Ghirardelli outlet store, (which was Amazing!) and got the Ghirardelli Chocolate Cookbook. All three of these recipes are from the book (however the combination was all me).


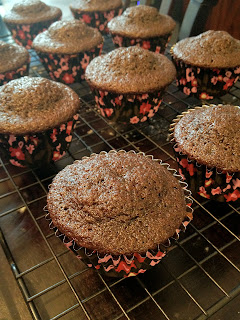
Notice the wrappers? They are Reynolds Pre-Baked Liners that I found at Schnucks. They stay bright even after baking, and I am in love with them! I will be definitely buying more of those.

Dark Chocolate Cupcakes
Yield: 24 Cupcakes
  • 1/2 cup Ghirardelli Unsweetened Cocoa
  • 2 1/4 cup flour
  • 2 1/2 teaspoon baking soda
  • 1/2 teaspoon salt
  • 2 large eggs
  • 1 cup firmly packed light brown sugar
  • 1 cup granulated white sugar
  • 1 1/4 cup whole milk
  • 2/3 cup strong brewed coffee or espresso (I used instant espresso powder with boiling water)
  • 1 cup unsalted butter
  1. Preheat the oven to 350°F. Line cupcake tins with paper liners. 
  2. Sift together the flour, cocoa, baking soda and salt. 
  3. In a medium bowl, whisk together the egg, brown sugar, and white sugar. 
  4. Whisk in the milk, coffee, and melted butter. 
  5. Whisk in the dry ingredients. 
  6. Divide the batter evenly among the cupcake molds, filling them about three-quarters full.
  7. Bake for 5 minutes, then insert a truffle into the center of each cupcake (recipe below)
  8. Bake for 10 more minutes
  9. Cool for 10 minutes in the pan.  
  10. Continue to cool on a wire rack to room temperature.
I was a little worried about the domes on top

Milk Chocolate Truffles
Yield: 30 truffles
  • 2 cups Ghirardelli Milk Chocolate Chips
  • 1/3 cup plus 2 tablespoons heavy cream
  • 1/2 tablespoon unsalted butter
  1. In a small saucepan, bring the cream to a simmer. 
  2. Add the butter and stir until melted. 
  3. Add the chocolate chips. Stir until completely melted and smooth. 
  4. Remove from the heat and pour into a shallow bowl.
  5. Cool, cover, and refrigerate the mixture until firm, at least 2 hours. (I am impatient so it went into the freezer to speed this up)
  6. Using a small scoop or small spoon, roll the mixture into 1/2 inch to 1 inch balls. 
  7. Freeze until hardened and ready to insert in cupcakes
Sadly, I don't have a picture of the truffles themselves, but they turned out well. I expected them to be a solid mass in the center after baking, but it seems they just dissolved into the dark chocolate batter. 

See: no definitive truffle after baking

Even though the truffle did not stay a solid mass as expected, these are pretty delicious! They got rave reviews at dinner tonight. (I was even called 'the most amazing baker ever'!) Smiles!

White Chocolate Swiss Meringue Buttercream
  • 12 oz Ghirardelli White Chocolate bar
  • 8 large egg whites
  • 2 C plus 4 T sugar
  • 2 C plus 4 T unsalted butter, at room temperature
  • 1 tsp pure vanilla extract
  • White Chocolate Chips to garnish
  1. Melt the white chocolate baking bar in the top of a double boiler, or in a heatproof bowl over barely simmering water, stirring occasionally until smooth. Cool to room temperature. 
  2. While the chocolate is cooling, combine the egg whites and sugar in the bowl of an electric mixer. 
  3. Place the bowl in a pot of simmering water so the water comes a third of the way up the bowl. 
  4. Lightly whisk the egg whites just until hot to the touch, about 1-1/2 minutes. 
  5. Remove the bowl from the pot on whisk on high speed until very thick and cooled to room temperature, about 5 minutes. 
  6. Decrease the mixer to medium-low speed and add the butter, 1 tablespoon at a time, mixing the butter in before adding the next tablespoon. 
  7. Add the melted white chocolate and vanilla and mix until smooth. 
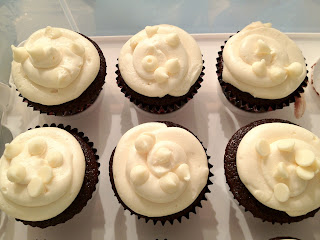
  8. Frost the top of each cupcake (I used tip #1A) and sprinkle them with the white chocolate chips.
This recipe was a swiss meringue buttercream, which I despise and love at the same time. It is temperamental and time-consuming, but delicious. I almost thought I messed it up when it came out super liquidy, but a little time in the freezer and a really good whip up on super-high level with the mixer turned it around. This frosting would be great on a white cupcake too, delicious in its own right.


After getting these frosted, they were surprisingly heavy, but the perfect density. I recommend refrigerating them a bit before enjoying.

Friday, October 14, 2011

White Chocolate Strawberry Cupcakes

White Chocolate Cupcakes with Strawberry Whipped Cream Frosting


My mom and I are off to the wineries in Defiance, MO in the morning and needed a snack to bring along. I have been wanting to try this recipe for White Chocolate Cupcakes for awhile now. The recipe originally called for a Strawberry Buttercream, but I have left-over whipping cream from my 'sturdy' buttercream and it goes bad rather quickly, so I opted to do a strawberry whipped cream frosting instead.

White Chocolate Cupcakes (from Raspberry Eggplant)
(makes 28 cupcakes)
  • 8 ounces good quality white chocolate, chopped (I use Ghirardelli)
  • 2 1/3 cups flour
  • 2 ½ teaspoons baking powder
  • ¼ teaspoon salt
  • ½ cup unsalted butter, room temperature
  • ¾ cup + 2 tablespoons sugar
  • 3 large eggs
  • 1 cup whole milk
  • ½ cup plain low-fat yogurt
  • 1 ½ teaspoons vanilla extract
  1.  Preheat oven to 350°F. 
  2. Melt the white chocolate in a double boiler. 
  3. Sift the flour, baking powder, and salt into a medium bowl and set it aside. Whisk the milk, yogurt, and vanilla into a medium bowl and set it aside.
  4. Beat the butter and sugar on medium speed until light and fluffy, about 3 minutes. Add the eggs one at a time, beating well after each addition. 
  5. Add half of the flour mixture, all of the milk mixture, and the remaining flour mixture, mixing well after each addition. Add the melted white chocolate. Mix on low speed to combine.
  6. Fill cups and bake for 18-20 minutes. Cool the cupcakes in the pan on a wire rack for 10 minutes, then remove the cupcakes and let them sit on the rack until they are completely cooled. 
The cupcakes came out good, but kind of dense. My boyfriend said they are kind of like muffins.

Pretty Little Cupcakes

Strawberry Whipped Cream Recipe (from Cupcake Project)
  • 1 cup heavy whipping cream 
  • 1/3 cup sugar 
  • 4 tablespoons food processed strawberries (take some fresh strawberries, wash them, remove the stems, and throw them in the food processor until they become a thick, seedy liquid) 
  1. Whip cream until it looks like whipped cream. 
  2. Mix in sugar. 
  3. Mix in strawberries until just combined. 
  4. Be sure to frost your cupcakes before you eat all of the strawberry whipped cream.
This was fabulous and simple! It tastes so fresh and light! This made exactly enough to frost 24 cupcakes, so you might want to double it. 

I used tip #2D which was a poor choice, the strawberries kept getting stuck in it!

Look at that Yummy Frosting!

Related Posts Plugin for WordPress, Blogger...