
Well, through all my research, I have come up with a few ideas to try. He gets yummy cupcakes on one condition: Send me a picture of what arrives to document my attempt.
Update 10/14/11: Scroll down and see why this is NOT the best way to ship cupcakes....learn from my mistakes! The cupcakes were fantastic before they left though!
Step 1: Buy a cupcake box with cupcake inserts. I got mine from here.
Step 2: Bake cupcakes, I chose to try out America’s test kitchen chocolate cupcakes. My boyfriend turned me on to them last year and it’s actually a pretty cool show that has apparently been on TV for years. You have to have a subscription to view their recipes, but I re-posted it below. Since then, I have wanted to try this so-called perfect cupcake, only without the filling because that’s too much work for an experiment in shipping cupcakes. Then I went searching for a “sturdy” icing and found this one from Colleen’s Recipes.
Chocolate Cupcakes (from America’s test kitchen)
- 3ounces bittersweet chocolate , chopped fine
- 1/3 cup cocoa powder
- 3/4 cup hot coffee
- 3/4 cup cake flour
- 3/4 cup sugar
- 1/2 teaspoon table salt
- 1/2 teaspoon baking soda
- 6 tablespoons vegetable oil
- 2 large eggs
- 2 teaspoons white vinegar
- 1 teaspoon vanilla extract
- Adjust oven rack to middle position and heat oven to 350 degrees.
- Place chocolate and cocoa in medium bowl. Pour hot coffee over mixture and whisk until smooth. Set in freezer to cool completely, about 10 minutes.
- Whisk flour, sugar, salt, and baking soda together in medium bowl; set aside.
- Whisk oil, eggs, vinegar, and vanilla into cooled chocolate-cocoa mixture until smooth.
- Add flour mixture and whisk until smooth.
- Divide batter evenly among 12 muffin pan cups. Bake until cupcakes are set and just firm to touch, about 17 minutes.
- Cool cupcakes in muffin pan on wire rack until cool enough to handle, about 10 minutes. Carefully lift each cupcake from muffin pan and set on wire rack. Cool to room temperature before frosting.
- Repeat. I don’t have a bowl big enough to hand whisk a doubled recipe, so I did it twice.
Sturdy Buttercream Frosting (from Colleen’s Recipes)
- 1 cup white Crisco shortening
- 1 cup butter (room temperature)
- 6½ cups of powdered sugar
- ½ cup whipping cream
- 2 teaspoons vanilla extract
- 1 teaspoon almond extract
- In the large bowl of a stand mixer, whip the shortening and butter together for about 3 minutes on high.
- Add 6 cups of powdered sugar, the extracts and whipping cream to the butter mixture and whip ON HIGH for about 10 minutes.
- Let set in freezer for 5-10 minutes before piping.
Step 3: Pipe icing in a swirl on cupcakes, I used Wilton tip #6B

Step 4: Put a stick in the cupcakes to the height of the box. I used cookie pop sticks I had lying around. The idea behind this is to keep the cupcakes from tipping over as much as possible. They are kind of ugly, but worth a shot.
 |
| With the sticks in them |
Step 5: Put a dab of Royal Icing on the bottom of each cupcake, and then put into box. The royal icing will harden and act as a glue to keep the cupcakes from sliding around or tipping over (hopefully).
 |
| I had two holes in my Ziploc accidentally, lol! |
Royal Icing: Makes about 1 ½ cups icing, which is more than you need. Cut in half if you want.
- 1 1/2 Tablespoons Meringue Powder
- 2 cups Powdered Sugar
- 2 1/2 Tablespoons warm water
Step 6: Freeze Overnight, this will harden the royal icing, and the cupcakes to keep them as sturdy as possible.
 |
| In the freezer to set |
Step 7: Stick box of cupcakes in another box. I put “This Side Up” in great big letters in hopes that USPS would listen.
Step 8: Send them off and hope they make it there intact. USPS didn't listen to my note! The first thing she does is flip it over! It cost me $37 to ship it overnight, Can't wait to see how they turn out!
Before Picture:
 |
| So pretty in the box! I really hope they stay that way! |
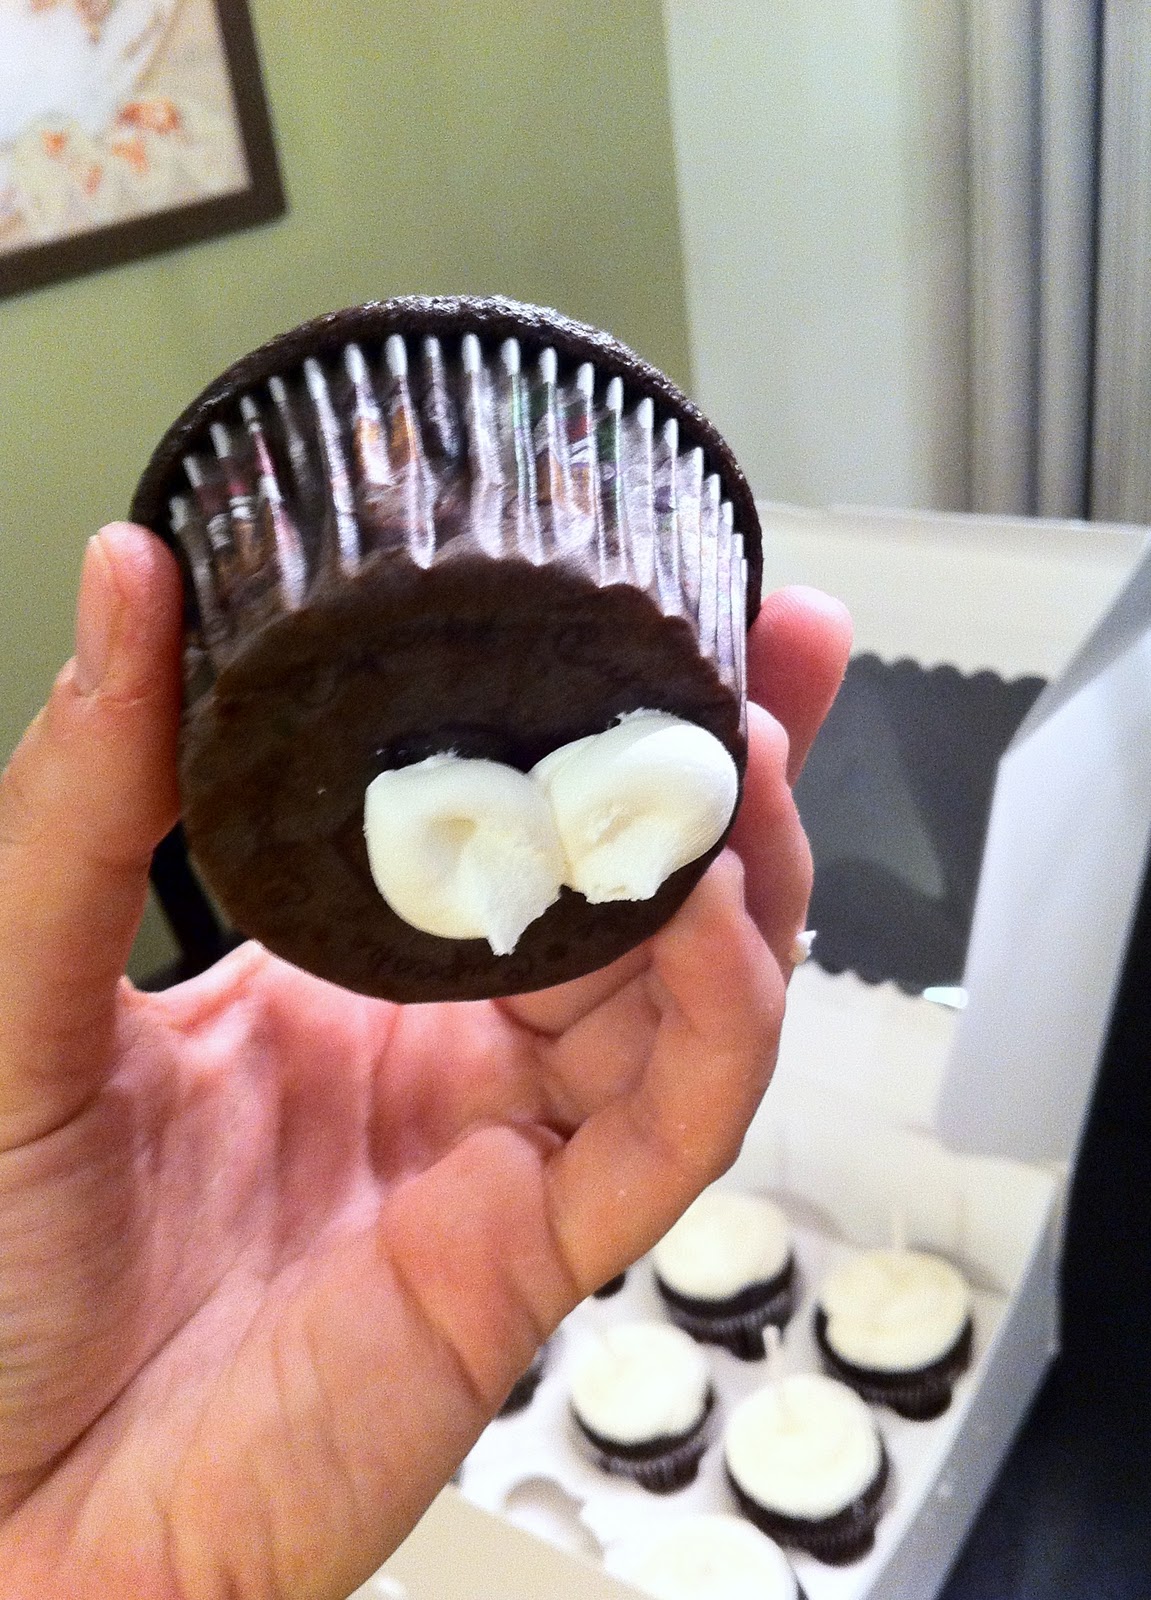
After Picture:
 |
| What a Mess!!! |
UPDATE 10/14/11: As you can see this was NOT the best way to ship cupcakes! Sad Face!! Oh, well. I suppose I will do some more research and try again. He said he was still gonna eat them, lol!
OH NO! I wonder if you send just one cup cake if you would have more success and work up from there.
ReplyDeleteMaybe, I just ordered a better package for them, they hold 6, I've also got a better plan to hold them in place!
ReplyDeleteAlso, no more USPS, its all FedEx or UPS from now on!