Saturday, October 29, 2011

Spooky Halloween Cupcakes

I made these Halloween Cupcakes for my Aunt to share with her co-workers. I used my go-to chocolate cupcake as a base, then topped it with a vanilla buttercream frosting colored orange that I got from the Cupcake Project. Then I topped them with assorted piped chocolate decorations.


My Go-To Chocolate Cupcakes are posted here. They are delicious with any kind of frosting!

Orange Vanilla Bean Buttercream (from the Cupcake Project)

Ingredients
1 1/2 cup powdered sugar
1/2 cup unsalted butter, room temperature
2 teaspoons vanilla bean paste
1 tablespoon milk
1/4 teaspoon red gel food coloring (add more or less to color)
1/2 teaspoon yellow gel food coloring (add more or less to color)

Directions
  1. Mix together sugar and butter until they are blended and creamy. 
  2. Add vanilla bean paste, milk, and food coloring and continue to beat for another minute. 
  3. Pipe on cooled cupcakes, I used tip #1A
Pre-Decoration


Chocolate Decorations
  1. Draw designs on paper and place beneath a sheet of wax paper as an outline. 
  2. Melt 4 oz of milk chocolate and 4 oz of white chocolate (separately) over double-boiler. 
  3. Fill piping bag fitted with a small circle tip 
  4. Trace outlines with the chocolate
  5. Place in Freezer to set.
  6. Add to cupcakes as garnish

They ended up really cute! I did have quite a few mess-ups before I got some usable decorations, but in the end they turned out really good!

The Finished Product


Friday, October 28, 2011

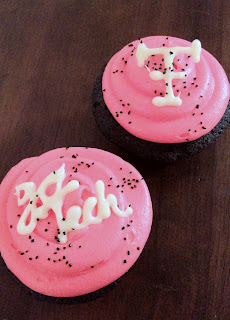
Texas Tech Cupcakes

Black Velvet Cupcakes with Red Cream Cheese Frosting


I'm going down to visit my brother and watch him play in the band for Texas Tech University, so I decided to make a 'Go Tech' cupcake! They are the Red Raiders, with colors of Black and Red.

I altered a blue velvet cupcake recipe from Sprinkle Bakes for this recipe.

My "Red" Frosting looks pink!


Black Velvet Cupcakes (adapted from Sprinkle Bakes)
makes 24-28 cupcakes
  • 2 C sugar
  • 2 sticks unsalted butter, softened
  • 2 eggs
  • 1 T Cocoa Powder
  • 1 T black food coloring
  • 2 1/2 C cake flour
  • 1 tsp salt
  • 1 C buttermilk
  • 1 tsp pure vanilla extract
  • 1/2 tsp baking soda
  • 1 T white vinegar
  1. Preheat oven to 350 degrees F. Prepare cupcake pan(s) with paper liners.
  2. In a mixing bowl, cream the sugar and butter, mix until light and fluffy. 
  3. Add the eggs 1 at a time and mix well after each addition. 
  4. Mix cocoa and food coloring together to form a paste, and then add to sugar mixture; mix well. 
  5. Sift together flour and salt. Add flour mixture to the creamed mixture alternately with buttermilk. 
  6. Blend in vanilla. 
  7. In a small bowl, combine baking soda and vinegar and add to mixture.
  8. Scoop batter into tins. Bake for 25-30 minutes
This recipe made a very dense cupcake with a tight crumb, you definitely need a glass of milk with these!

See how dense they are!
Red Cream Cheese Frosting
  • 1 lb cream cheese
  • 2 sticks butter, softened
  • 1 tsp pure vanilla extract
  • 4 C powdered sugar
  • Red Food Coloring, to color.
  1. In a large mixing bowl, beat the cream cheese, butter, vanilla, and food coloring together until smooth. 
  2. Add the sugar and on low speed, beat until incorporated. 
  3. Increase the speed to high and mix until very light and fluffy. 
  4. Pipe frosting onto cupcakes using a large round tip. I used tip #1A
I had a really hard time getting the frosting to look red, I used a ton of gel food coloring, maybe it would have worked better had I used liquid coloring.

I  melted down some white chocolate and piped out  "Go Tech!" and the TT Logo to garnish. The white chocolate melts very quickly, so I had to transfer them quickly from the freezer to the cupcakes.

The Finished Product

Saturday, October 22, 2011

Halloween Funfetti Cupcakes

I have always loved funfetti cake mixes, especially when its the holiday versions! But I just had to doctor it up a bit this year.


I got this recipe from the Cake Mix Doctor forums, the cake turned out very light and fluffy! I got 28 out of this recipe.

Erin's Not so Plain Vanilla Cake
1 box Halloween funfetti cake mix
1 box vanilla instant pudding
1 cup vanilla yogurt
1/2 cup vegetable oil
1/2 cup milk
4 eggs
1 tsp vanilla extract

Mix together, then beat on medium for 2 minutes. Bake at 350 degrees for 17-19 minutes.

I got these really cute decorations at Micheal's:


Ice with Funfetti Icing. Add about 3/4 cup of powdered sugar and whip up in the mixer. I piped on with tip 2D. Then add the sprinkles.

NOTE: You need 2 containers of Funfetti icing per batch of cupcakes. I didn't realize this until I iced about 3/4 of the cupcakes. A quick run to Dierbergs, just to find out the don't have the Halloween Funfetti! I got a regular Funfetti and colored it orange, a big hassle, but I was able to match the color almost perfectly!

This was extremely simple, but delicious!


Tuesday, October 18, 2011

Celebrating National Chocolate Cupcake Day


Today was National Chocolate Cupcake Day (yes that exists!), so I just had to make chocolate cupcakes! I also found out that there is a National Vanilla Cupcake Day (Nov. 10) and a National Lemon Cupcake Day (Dec. 15) coming up. There is a handy list of all the national food days here. This is a whole new level of excitement for me!

America's Test Kitchen has my go-to chocolate cupcake recipe, and I topped them off with Martha Stewart's Ultimate Chocolate Frosting.

I have to say these are AHHHMAZING! The boyfriend wholeheartedly agrees!

America’s Test Kitchen Ultimate Chocolate Cupcake
Makes 24 cupcakes

Ingredients
Delicious little cup of coffee
  • 6 ounces bittersweet chocolate , chopped fine (see note) 
  • 2/3 cup cocoa powder
  • 1 1/2 cup hot coffee (I used my Belgian Chocolate Keurig Cups)
  • 1 1/2 cup cake flour 
  • 1 1/2 cup sugar 
  • 1 teaspoon salt 
  • 1 teaspoon baking soda 
  • 3/4 cup vegetable oil 
  • 4 large eggs 
  • 4 teaspoons white vinegar 
  • 2 teaspoon pure vanilla extract 
Directions
  1. Adjust oven rack to middle position and heat oven to 350 degrees.  
  2. Place chocolate and cocoa in medium bowl. Pour hot coffee over mixture and whisk until smooth. Set in refrigerator to cool completely, about 20 minutes. 
  3. Whisk flour, sugar, salt, and baking soda together in medium bowl; set aside. 
  4. Whisk oil, eggs, vinegar, and vanilla into cooled chocolate-cocoa mixture until smooth. 
  5. Add flour mixture and whisk until smooth. 
  6. Divide batter evenly among muffin pan cups. Bake 17 to 19 minutes. Cool cupcakes in muffin pan about 10 minutes. Carefully lift each cupcake from muffin pan and set on wire rack. Cool to room temperature before frosting.


Martha Stewart’s Ultimate Chocolate Frosting
Makes about 3 cups

Ingredients
  • 3 1/2 cups powdered sugar 
  • 1 cup cocoa powder 
  • 12 tablespoons (1 1/2 sticks) unsalted butter, room temperature 
  • 1/2 cup milk, room temperature 
  • 2 teaspoons pure vanilla extract 
Directions
  1. In a small bowl, sift together the powdered sugar and cocoa powder. 
  2. Add butter, milk, and vanilla 
  3. Stir until smooth and free of lumps. 
  4. Pipe on Cupcakes (I used tip 6B)
  5. Garnish with mini-chocolate chips


Saturday, October 15, 2011

Cute Little Doughnuts

Vanilla Bean Doughnuts with Pink Sugar Glaze

OK, so these aren't cupcakes, but they are sooo cute! I got a doughnut pan on a whim at Bed, Bath, and Beyond one day and have been waiting for a time to use it. I got up early this morning and decided to try it out. 


Yield: 1 dozen donuts

Doughnuts (adapted from Sprinkle Bakes)
  • 1 cups flour 
  • 6 T sugar 
  • 1 tsp. baking powder 
  • 1/4 tsp. salt 
  • 6 T buttermilk 
  • 1/2 tsp. plus ½ Tablespoon vanilla bean paste 
  • 1 egg, lightly beaten 
  • 1 T butter, melted 
1. Preheat oven to 425°F. Spray donut pan with nonstick cooking spray.

2. In large mixing bowl, sift together flour, sugar, baking powder and salt.

3. Add buttermilk, eggs, vanilla extract, vanilla seeds and butter and beat until just combined.

4. Fill each donut cup approximately 1/2 full. (its easiest if you use a piping bag)

5. Bake 5 minutes or until the top of the donuts spring back when touched.

6. Let cool in pan for 5 minutes before removing.

7. Finish doughnuts with vanilla glaze and sprinkles 

Into the oven they go
And out they come!
Pink Vanilla Glaze: 
  • 1 1/2 cups powdered sugar 
  • 1 1/2 T milk 
  • ½ tsp. vanilla bean paste 
  • 4 drops of liquid red food coloring 
  • Pink Sprinkles 

1. In small bowl, stir together sugar, milk and vanilla extract until sugar is completely dissolved.

2. Add food coloring and stir until color is uniform.

3. Dip cooled donuts into glaze, lift and twist out.

4. Let drip on cooling rack with parchment paper beneath.

5. Sprinkle on the sprinkles.

Complete with Glaze and Sprinkles!

This recipe was super easy, and the Doughnuts taste great! I'm gonna have to make this a weekend morning routine! : )

Banana Bunny Cupcakes for Grandma

Banana Cupcakes with Chocolate Banana Frosting


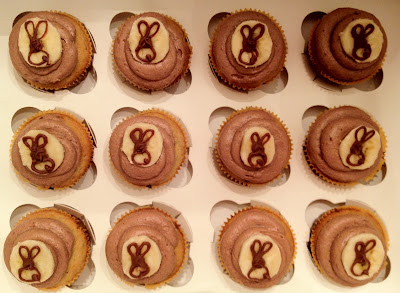
My grandma's birthday is Sunday, so naturally I made her cupcakes! She likes Banana Cake, Chocolate, and Bunnies (especially bunnies)! Here's a cupcake that combines them all.

Banana Cupcakes (From Cupcake Project)
(made 22 cupcakes)

I found this recipe and it appealed to me because it looked super easy, and it was! Pop everything in the mixer and off to the oven they go. The cake was dense, but good, like a very moist banana bread in cupcake form! Goes perfectly with the chocolate banana frosting!
Little Bunny Garnish
  • 1 Stick Butter 
  • 1 C Sugar 
  • 2 Eggs 
  • 1/2 C Sour Cream 
  • 1 tsp baking soda 
  • 2 C flour 
  • 1 tsp vanilla 
  • 2 Bananas, smashed 
  1. Cream Butter and Sugar 
  2. Add Eggs 
  3. Add Sour Cream, Flour, and Baking Soda 
  4. Add vanilla and smashed Bananas 
  5. 5.Bake for 16-18 mins at 350 degrees.
Hop Hop Hop!

Chocolate Banana Frosting (from Love and Olive Oil)
  • 1 cup butter (2 sticks), room temperature 
  • 1/2 cup ripe banana, smashed (about 1 banana) 
  • 4 tablespoons cocoa powder 
  • 4-5 cups confectioners' sugar 
  • 2 teaspoon vanilla extract
  1. Cream butter until smooth and fluffy, 2-3 minutes 
  2. Add banana and mix on high speed until few lumps remain. 
  3. Add cocoa powder and 1 cup powdered sugar and beat until combined. 
  4. Continue adding powdered sugar, 1/2 cup at a time, mixing well after each addition until you reach the desired consistency. 
  5. Mix in vanilla. Continue beating until light and fluffy, about 3-5 minutes, adding more sugar if necessary. 
  6. Pipe onto cooled cupcakes. I used Wilton tip #1A. Garnish with banana slices. 

Pre-Bunny


So cute!
Banana  Garnish

To garnish these cupcakes I took a slice of banana and piped a bunny figure, using Wilton Tip #2 onto each one with melted milk chocolate. 

Every day I wonder why we haven't bought a microwave yet! I am sick of the double boiler! 

Make sure to pop em in the freezer for a few minutes to harden the chocolate. (these are yummy to eat by themselves too!)


The Finished Product
In their 'rabbit hole' off to see Grandma!

Friday, October 14, 2011

White Chocolate Strawberry Cupcakes

White Chocolate Cupcakes with Strawberry Whipped Cream Frosting


My mom and I are off to the wineries in Defiance, MO in the morning and needed a snack to bring along. I have been wanting to try this recipe for White Chocolate Cupcakes for awhile now. The recipe originally called for a Strawberry Buttercream, but I have left-over whipping cream from my 'sturdy' buttercream and it goes bad rather quickly, so I opted to do a strawberry whipped cream frosting instead.

White Chocolate Cupcakes (from Raspberry Eggplant)
(makes 28 cupcakes)
  • 8 ounces good quality white chocolate, chopped (I use Ghirardelli)
  • 2 1/3 cups flour
  • 2 ½ teaspoons baking powder
  • ¼ teaspoon salt
  • ½ cup unsalted butter, room temperature
  • ¾ cup + 2 tablespoons sugar
  • 3 large eggs
  • 1 cup whole milk
  • ½ cup plain low-fat yogurt
  • 1 ½ teaspoons vanilla extract
  1.  Preheat oven to 350°F. 
  2. Melt the white chocolate in a double boiler. 
  3. Sift the flour, baking powder, and salt into a medium bowl and set it aside. Whisk the milk, yogurt, and vanilla into a medium bowl and set it aside.
  4. Beat the butter and sugar on medium speed until light and fluffy, about 3 minutes. Add the eggs one at a time, beating well after each addition. 
  5. Add half of the flour mixture, all of the milk mixture, and the remaining flour mixture, mixing well after each addition. Add the melted white chocolate. Mix on low speed to combine.
  6. Fill cups and bake for 18-20 minutes. Cool the cupcakes in the pan on a wire rack for 10 minutes, then remove the cupcakes and let them sit on the rack until they are completely cooled. 
The cupcakes came out good, but kind of dense. My boyfriend said they are kind of like muffins.

Pretty Little Cupcakes

Strawberry Whipped Cream Recipe (from Cupcake Project)
  • 1 cup heavy whipping cream 
  • 1/3 cup sugar 
  • 4 tablespoons food processed strawberries (take some fresh strawberries, wash them, remove the stems, and throw them in the food processor until they become a thick, seedy liquid) 
  1. Whip cream until it looks like whipped cream. 
  2. Mix in sugar. 
  3. Mix in strawberries until just combined. 
  4. Be sure to frost your cupcakes before you eat all of the strawberry whipped cream.
This was fabulous and simple! It tastes so fresh and light! This made exactly enough to frost 24 cupcakes, so you might want to double it. 

I used tip #2D which was a poor choice, the strawberries kept getting stuck in it!

Look at that Yummy Frosting!

Thursday, October 13, 2011

How to Ship Cupcakes?


My brother is in his freshman year at Texas Tech University, which is exciting, but a long way away from home (St. Louis, MO). Ever since he moved down there I have been trying to find a way to ship cupcakes without them being destroyed.

Well, through all my research, I have come up with a few ideas to try. He gets yummy cupcakes on one condition: Send me a picture of what arrives to document my attempt.

Update 10/14/11: Scroll down and see why this is NOT the best way to ship cupcakes....learn from my mistakes! The cupcakes were fantastic before they left though!

Step 1: Buy a cupcake box with cupcake inserts. I got mine from here.

Step 2: Bake cupcakes, I chose to try out America’s test kitchen chocolate cupcakes. My boyfriend turned me on to them last year and it’s actually a pretty cool show that has apparently been on TV for years. You have to have a subscription to view their recipes, but I re-posted it below. Since then, I have wanted to try this so-called perfect cupcake, only without the filling because that’s too much work for an experiment in shipping cupcakes. Then I went searching for a “sturdy” icing and found this one from Colleen’s Recipes.

Chocolate Cupcakes (from America’s test kitchen)
  • 3ounces bittersweet chocolate , chopped fine 
  • 1/3 cup cocoa powder
  • 3/4 cup hot coffee
  • 3/4 cup cake flour 
  • 3/4 cup sugar 
  • 1/2 teaspoon table salt 
  • 1/2 teaspoon baking soda 
  • 6 tablespoons vegetable oil 
  • 2 large eggs 
  • 2 teaspoons white vinegar 
  • 1 teaspoon vanilla extract 
  1. Adjust oven rack to middle position and heat oven to 350 degrees. 
  2. Place chocolate and cocoa in medium bowl. Pour hot coffee over mixture and whisk until smooth. Set in freezer to cool completely, about 10 minutes. 
  3. Whisk flour, sugar, salt, and baking soda together in medium bowl; set aside. 
  4. Whisk oil, eggs, vinegar, and vanilla into cooled chocolate-cocoa mixture until smooth. 
  5. Add flour mixture and whisk until smooth. 
  6. Divide batter evenly among 12 muffin pan cups. Bake until cupcakes are set and just firm to touch, about 17 minutes. 
  7. Cool cupcakes in muffin pan on wire rack until cool enough to handle, about 10 minutes. Carefully lift each cupcake from muffin pan and set on wire rack. Cool to room temperature before frosting. 
  8. Repeat. I don’t have a bowl big enough to hand whisk a doubled recipe, so I did it twice. 
This was a fantastic chocolate cupcake! I would make it again and again because it was sooo easy! They are the perfect density and have a great but not overpowering chocolate flavor.

Sturdy Buttercream Frosting (from Colleen’s Recipes)
  • 1 cup white Crisco shortening
  • 1 cup butter (room temperature) 
  • 6½ cups of powdered sugar
  • ½ cup whipping cream
  • 2 teaspoons vanilla extract
  • 1 teaspoon almond extract 
  1. In the large bowl of a stand mixer, whip the shortening and butter together for about 3 minutes on high. 
  2. Add 6 cups of powdered sugar, the extracts and whipping cream to the butter mixture and whip ON HIGH for about 10 minutes. 
  3. Let set in freezer for 5-10 minutes before piping. 
This makes a lot of icing, so you may want to cut it in half.

Step 3: Pipe icing in a swirl on cupcakes, I used Wilton tip #6B


Step 4: Put a stick in the cupcakes to the height of the box. I used cookie pop sticks I had lying around. The idea behind this is to keep the cupcakes from tipping over as much as possible. They are kind of ugly, but worth a shot. 

With the sticks in them


Step 5: Put a dab of Royal Icing on the bottom of each cupcake, and then put into box. The royal icing will harden and act as a glue to keep the cupcakes from sliding around or tipping over (hopefully). 

I had two holes in my Ziploc accidentally, lol!

Royal Icing: Makes about 1 ½ cups icing, which is more than you need. Cut in half if you want.
  • 1 1/2 Tablespoons Meringue Powder 
  • 2 cups Powdered Sugar 
  • 2 1/2 Tablespoons warm water 
Beat all ingredients until icing forms peaks (7-10 minutes at low speed)

Step 6: Freeze Overnight, this will harden the royal icing, and the cupcakes to keep them as sturdy as possible. 

In the freezer to set

Step 7: Stick box of cupcakes in another box. I put “This Side Up” in great big letters in hopes that USPS would listen.

Step 8: Send them off and hope they make it there intact. USPS didn't listen to my note! The first thing she does is flip it over! It cost me $37 to ship it overnight, Can't wait to see how they turn out!

Before Picture: 
So pretty in the box! I really hope they stay that way! 
There will be an Update as soon as my brother receives the batch of cupcakes! Wish them luck on their journey! 
After Picture:
What a Mess!!!

UPDATE 10/14/11: As you can see this was NOT the best way to ship cupcakes! Sad Face!! Oh, well. I suppose I will do some more research and try again. He said he was still gonna eat them, lol!


Tuesday, October 11, 2011

The 75 calorie cupcake!

I have been making so many cupcakes lately, that it seems my jeans are a bit more snug than I would like! My goal today was to create a low-calorie, yet delicious cupcake for a guilt-free indulgence.

I scoured the internet for substitutions to regular ingredients, but struggled to cut the calories from the flour and butter. There are 400 calories per cup of flour, and most recipes call for about 2 cups, that’s 800 calories right there. Then there’s the butter with 100 cals per tablespoon, which adds up to 800 calories per stick, with 1 ½ to 2 sticks per recipe! You can be up to 100 calories per cupcake with just the flour and butter, not to mention the sugar and rest of ingredients!

Then I decided that the best route was not to start substituting ingredients from a recipe I know, but to search for a recipe designed to be low-cal. That’s when I found this recipe from Grin and Bake it, and this recipe from Splenda. Naturally, that came out to be too many calories for my liking so I started substituting things again.


Diet Soda Cupcakes (modified from Grin and Bake it)

  • 1 box Pillsbury sugar-free devil’s food cake mix - 1440 cals (I didn’t even know this existed until I stumbled upon it at Schnucks) 
  • 1 12 oz. can Diet Coke - 0 cals 
  • 2 egg whites (or 1/3 cup of liquid whites) - 32 cals 

Total Cals: 1472 ÷ 24 cupcakes = 61.33 cals per cupcake

  1. Preheat oven to 350 degrees. 
  2. Add the cake mix and eggs whites in a mixing bowl. 
  3. Pour in the can of Diet Coke. Beat until smooth. 
  4. Fill cupcake liners 2/3 full. Bake for about 15 minutes, or until a toothpick inserted comes out clean. 

The cupcakes turned out very light and fluffy. They did stick to the liners quite a bit, but storing them in the fridge for a few hours loosened them up.


Fluffy White Icing (modified from the Splenda website)

  • 2 large egg whites (or 1/3 cup liquid whites) - 32 cals 
  • 3/4 cup DiabetiSweet - 320 cals (The recipe called for Splenda Baking Blend, but that would have been 720 calories and I had excess DiabetiSweet, so I decided to save some more calories there!) 
  • 1/3 cup water - 0 cals 
  • 3 teaspoons pure vanilla extract - 0 cals (if you use high quality vanilla with no sugar or additives there will be zero calories) 
  • 1 pinch of salt - 0 cals 

Total Cals: 352 ÷ 32 cupcakes = 11 cals per cupcake (the icing made enough to frost about 32 cupcakes)

  1. In the metal bowl of an electric mixer, briefly whisk together egg whites, DiabetiSweet, water, vanilla, and salt. 
  2. Set bowl over saucepan of gently simmering water and whisk gently until mixture reaches 160 degrees F on an instant-read thermometer.  Remove from heat and, using the whisk attachment on your mixer, whip icing on medium speed about 5-7 minutes, or until icing increases in volume and cools. 
  3. Use a plain piping bag with the tip cut off to pipe these, the icing is not stiff enough to hold the shape of a tip. 
Total per Cupcake: 61.33
Total Icing per Cupcake: 11
Total Cals per Cupcake: 72.33 (Now that I’d call a guilt-free cupcake!!) 


You couldn’t tell that these were low-calorie cupcakes! They are delicious, and also happened to be completely sugar-free!

Saturday, October 8, 2011

Yummy Biscoff Spread


Devil’s Food Cupcakes with Whipped Biscoff Ganache


My new cupcake boxes! Love em!!
If any of you have ever flown on Delta Airlines, you probably have had Biscoff cookies. They give them out as an option instead of peanuts, and I always choose the cookies! They are delicious little spice cookies and I recently found out that they make a spread out of them! It has a consistency similar to peanut butter, but you have to order it. Apparently it’s pretty popular in Europe.

Once the glass jars of Biscoff arrived, I scoured the internet to find the perfect recipe where I could use it. I landed on Biscoff’s website; a recipe for whipped Biscoff Ganache. They had it on Devil’s food cake, but I wanted a recipe that had reviews so I knew it was good. I got the Cupcake recipe from Chockylit.

Devil's Food Chocolate Cupcakes (from Chockylit)
makes 24 cupcakes

2 cups flour
2 cups sugar
1/2 cup unsweetened cocoa powder
1-1/2 teaspoons baking soda
1-1/2 cups milk
1/2 cup butter
2 teaspoons vanilla
2 eggs

Preheat oven to 350 degrees.

1. Measure out everything but the eggs directly into your mixer bowl.
2. Mix on low speed just until incorporated.
3. Beat on high speed for 2 minutes.
4. Add eggs; beat on high speed again for 2 minutes.

Scoop batter into lined cupcake pans. Bake for about 18-20 minutes until a toothpick comes out clean. Let cool slightly in the pan then transfer to a rack to cool completely before frosting.

I had a little problem with mine, the tops overflowed so it stuck to the pans. Make sure not to fill cups too high. I was also worried because they came out really flat:


But they ended up tasting great! They were very light and fluffy!


Whipped Biscoff Ganache (adapted from Biscoff's Website)

  • 4.5 ounces bittersweet (70% cacao) chocolate, chopped (OR ¾ cup chips) 
  • 4.5 ounces milk (40% cacao) chocolate, chopped 
  • one 14-ounce jar Biscoff spread (order it here)
  • 1 2/3 cups heavy cream, cold
  • 1/2 C to 1C powdered sugar


Making the Whipped Biscoff Ganache:

1. Place both chocolates in the top of a double boiler set over hot water and allow to melt, stirring often.
2. Remove from heat and whisk in the Biscoff spread.
3. Add the heavy cream and with the help of an electric mixer, whisk until soft peaks form.
4. Add powdered sugar until frosting becomes thicker. You may need to pop it in the freezer for 10 minutes.
5. Pipe onto cupcakes

You need to store these in the fridge for a few hours before serving so the frosting hardens up a bit.

Yummy little cupcakes! Mom even ate a whole one(almost)!! (she usually can only handle a tiny bite of chocolate, I know, crazy right?)


Mimosa's for Brunch

A.K.A. The Champagne Adventures: Part 3


You might wonder where parts 1 and 2 are, well my adventures with Champagne started several weeks ago with the ‘Strawberries and Champagne’ idea. Sounds perfect right? Well, getting the Champagne part of the equation right proved to be more difficult than expected.

First I tried a Champagne Glaze from the Cupcake Project, but that just made the cupcakes soggy and sticky, not to mention the mess it made of my kitchen!

Then, I tried a different recipe from the Cupcake Project for a Champagne Mascarpone Frosting. It was good, but not great. It didn’t quite taste like Champagne. Probably because it didn’t actually have Champagne in it; Champagne Flavoring was the substitute. It also started to melt off the cupcakes when sitting out on the counter for a couple of hours.

Well, I didn’t want to settle for just a good recipe, so I was still searching for the perfect Champagne frosting. Since my White Wine Cupcakes turned out fantastically, I thought “Why not substitute the wine for Champagne?” I also thought, since Champagne has a weak flavor, I would add a couple drops of the flavoring I had left over. It turned out great! Sweet, with a subtle Champagne flavor and was a stiffer consistency.

Now on to the Mimosas! We had a family brunch (well brunch/lunch...i'm not sure you can call it brunch after 11am) this morning, so I figured Mimosa Cupcakes would go along perfectly. An orange cupcake with Champagne frosting in one hand and a mimosa drink in the other!

Orange Cupcakes (From the Cupcake Project)

These were denser cupcakes, but tasted good. The batter was VERY orange-y, but it baked out to a light orange flavor.

Ingredients:
2/3 C sugar (for the zest)
finely grated zest of 1 orange
1 C orange juice concentrate
1/2 C sugar (for the concentrate)
2 C flour
1 1/2 t baking powder
1/2 t baking soda
3/4 C butter, room temperature
2 eggs
2/3 C plain yogurt

Directions:
1. A few hours before you are ready to bake, combine the orange zest and the sugar in a bowl. This will let the orange flavor infuse into the sugar.

2. While you are waiting, prepare an orange syrup by bringing the orange juice concentrate and sugar to a boil in a saucepan. Stir continuously until it is thoroughly combined and gets slightly thicker (about 10 minutes). Remove from heat and return to room temperature. 

Should look like this:

3. With a fork, whisk flour, baking powder, and baking soda in a bowl.

4. Beat butter and the sugar with grated orange zest in a large bowl for 1 minute, until light and fluffy.

5. Beat in eggs and yogurt until blended.

6. Alternately fold in flour mixture and 2/3 cup of the orange syrup (that should be pretty much all of the syrup) in three additions, beginning and ending with flour.

7. Fill cupcake liners 3/4 full.

8. Bake at 350 F for about 25 minutes or until a toothpick comes out of the cupcake clean.


White Chocolate Champagne Buttercream Frosting (Adapted fromWe are not Martha)

Ingredients:
1 1/2 C unsalted butter, softened
6 oz. white chocolate (I use Ghirardelli Bars)
3 1/2 C powdered sugar
4 teaspoons Champagne (you can add extra to taste)
3 drops Champagne Flavoring (you can order it here)

Directions:

1. Melt white chocolate on the stove in a double boiler

2. Cream the butter at medium speed until it looks light and fluffy (3-4 minutes)

3. Beat in melted white chocolate

4. Add 1/2 C powdered sugar, then 1/2 teaspoon Champagne, making sure each is incorporated before adding the next. Repeat until all the powdered sugar and Champagne are blended in. Add in the Champagne flavoring.

5. If it's too thin, put the bowl of icing in the freezer for 10-15 minutes to thicken it up, and then give it a good beating with the mixer before filling your piping bag.

6. Pipe icing onto cupcakes. I used my mom's new tip # 2D for these.


Wednesday, October 5, 2011

Irish Car-Bomb Cupcakes


Chocolate Stout Cupcakes filled with Ganache and topped with Irish Whipped Cream Frosting 


My first experiences with baking with alcohol was through my Champagne Frosting adventures (more to come on that subject later), and then just recently with my white wine frosting. I’ve never tried to bake it in, but I recently came across a recipe from the Craving Chronicles and decided to use it in conjunction with a Bailey’s Whipped Cream Frosting from the Cupcake Project.

At first bite, the cupcakes were quite boozy! I’m hoping that as they settle they will get better. The Bailey’s Frosting was divine, I could eat it with a spoon, no cupcakes needed!

Update 10/6/11: The cupcakes were 100% better the next morning! The strong alcohol flavor has subsided and you are left with a subtle hint of Bailey's. The Ganache blended really well into the rest of the cake. Everyone loved them at work (took them to a staff meeting) and only have one or two left! If you are worried about the alcohol flavoring, or don't want to leave them in the fridge overnight,  leave the whiskey out of the Ganache, that's where the strong flavor came from. 


Chocolate Stout Cupcakes (From the Craving Chronicles)
1 cup Guinness
1 cup (2 sticks) unsalted butter
3/4 cup cocoa powder
2 cups flour
2 cups sugar
1 1/2 teaspoons baking soda
3/4 teaspoon salt
2 large eggs
2/3 cup full-fat sour cream

Ganache Filling
 8 ounces bittersweet chocolate
2/3 cup heavy cream
2 tablespoons butter, room temperature
2 teaspoons Irish whiskey (I used Jameson, and had to buy some so now I have an almost full bottle in my cabinet!)

Baileys Frosting (from the Cupcake Project)
4 C heavy whipping cream
1 1/3 C sugar
4 T Bailey’s Irish Cream

Step 1: Make the cupcakes:
1. Preheat oven to 350°F. Line 24 cupcake cups with liners.
2. Bring 1 cup stout and 1 cup butter to simmer in heavy large saucepan over medium heat.
3. Add cocoa powder and whisk until mixture is smooth. Cool slightly.
4. Whisk flour, sugar, baking soda, and 3/4 teaspoon salt in large bowl to blend.
5. Using electric mixer, beat eggs and sour cream in another large bowl to blend.
6. Add stout-chocolate mixture to egg mixture and beat just to combine.
7. Add flour mixture and beat briefly on slow speed.
8. Using rubber spatula, fold batter until completely combined.
9. Fill cupcakes and bake for about 17 minutes.

Step 2: Make the filling:
1. Chop the chocolate and transfer it to a heatproof bowl.
2. Heat the cream until simmering and pour it over the chocolate. Let it sit for one minute and then stir until smooth.
3. Add the butter and whiskey and stir until combined.

Step 3: Fill the cupcakes:
1. Let the Ganache cool until thick but still soft enough to be piped (I put mine in the freezer for about 5 minutes, stirred, then put back in freezer for 5 more minutes)
2. Cut a conical shape out of the cupcakes
3. Put the Ganache into a piping bag, cut the corner off, and pipe into cupcakes
4. Remove excess cupcake from core, and replace the top

Filled Cupcakes:


Step 4: Make the Frosting: 
1. Whip heavy whipping cream until it looks like whipped cream.
2. Mix in sugar and Bailey’s Irish Cream until just combined.
3. Pipe onto cupcakes
4. Garnish with Chocolate Shavings

The finished product:


Related Posts Plugin for WordPress, Blogger...